Blog

  • Fast Log Splitter: Top Picks and Expert Advice for 2023

    Fast Log Splitter: Top Picks and Expert Advice for 2023


    Log splitters are essential tools for land owners who need to split firewood quickly and efficiently.

    Using an axe or a maul is both slow, and tiresome.

    Not all splitters are created equal though – a fast log splitter simplifies the process, making it easy to create a supply of firewood for heating or outdoor usage. Fast log splitters are designed to help land owners get their log splitting done, and free up time for other tasks.

    In a Hurry? OUR TOP FAST LOG SPLITTER PICK –

    Landworks Log Splitter

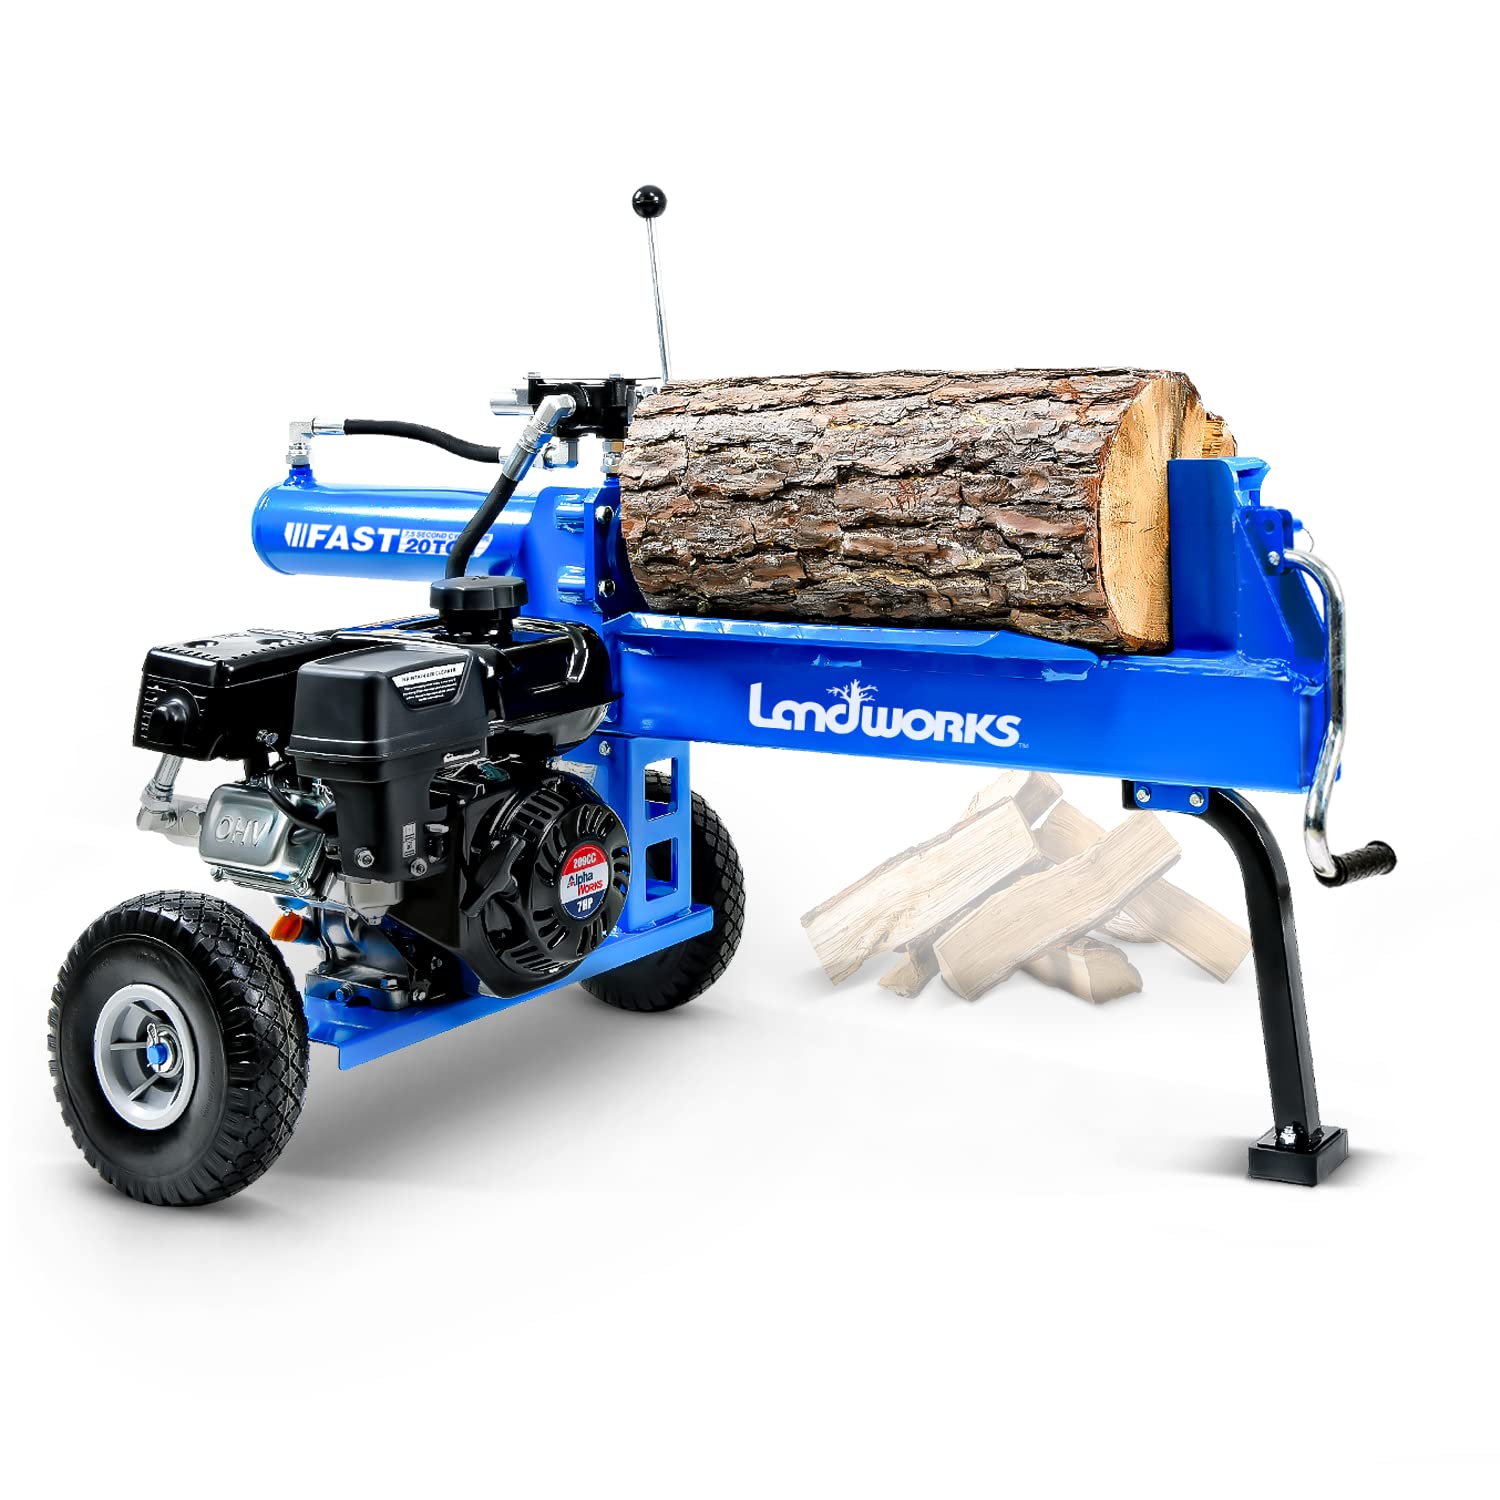
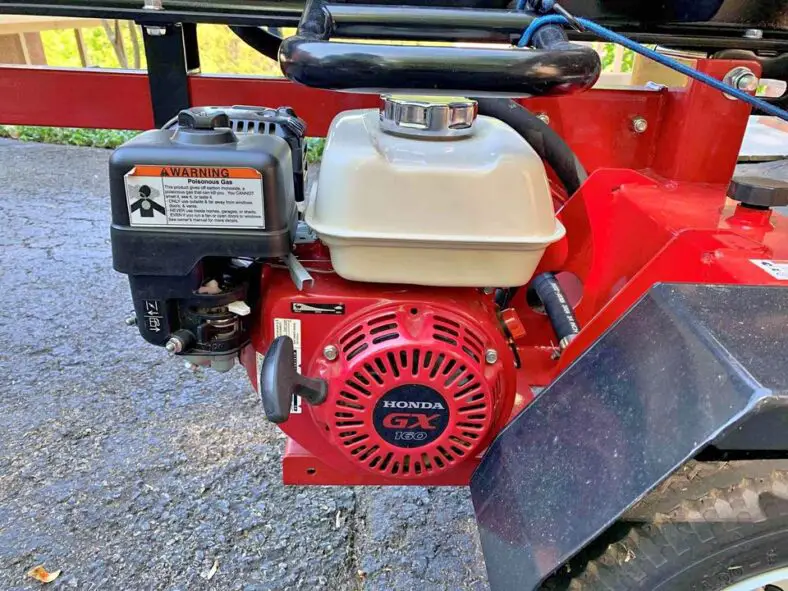
    After a thorough analysis and testing of various fast log splitters on the market, our top pick for the fastest log splitter is the “Landworks Log Splitter Portable 20 Ton”. This gas-powered machine showcases an impressive 7.5-second cycle time, allowing it to split logs swiftly and efficiently.

    The Landworks Log Splitter’s superior speed is attributed to its powerful 7HP gas engine and a robust 20-ton rated system that works cohesively to ensure an efficient and high-speed performance. Moreover, the 2-Stage Bucher Hydraulic Gear Pump further enhances the speed at which the logs are split.

    Despite its high-speed performance, the Landworks Log Splitter does not compromise on other essential aspects. It offers portability with its lightweight design, 10″ sturdy transport wheels, and is easy to set up, enhancing its overall convenience.

    Therefore, if speed is your top priority in a log splitter, the Landworks Log Splitter Portable 20 Ton stands out as the fastest option. However, bear in mind that as with any gas-powered machinery, it requires outdoor use and proper ventilation due to its exhaust emissions.

    Fast Log Splitter Comparison Table

    Link:Landworks Log Splitter Portable 20 TonChampion Power Equipment 25-Ton Log SplitterPowerhorse Horizontal/Vertical Log Splitter – 22 TonsSuperHandy Portable 25 Ton Gas Log Splitter
    Engine7HP gas engine224cc single-cylinder OHV engine212cc engine7HP AlphaWorks engine
    Splitting Force20 ton25 ton22 ton25 ton
    Cycle Time7.5 seconds11 secondsNot mentioned12 seconds
    Weight130 lbs434 lbsNot mentioned238 lbs
    Hydraulic Fluid Included?NoNot mentionedNot mentionedNo

    This table should provide a quick and clear comparison of each product’s key features. However, it’s important to note that potential buyers should consider their specific needs and circumstances when choosing a log splitter.

    For example, while a powerful engine and fast cycle time can speed up the splitting process, aspects like weight and portability might be more important to those who need to move the machine frequently.


    There are various types of log splitters available, including:

    • manual
    • electric
    • gas-powered
    • hydraulic models

    Fast log splitters specifically focus on the speed at which the machine can split logs, often featuring powerful engines or mechanisms that allow for easier splitting. Many users prioritize efficiency and convenience when choosing a log splitter, as these factors can significantly impact the overall experience.

    When considering a fast log splitter, it is crucial to pay attention to the

    • power source
    • splitting force
    • cycle time
    • and ease of use.

    These factors play a significant role in the speed and efficiency of the tool. Additionally, consider the size, weight, and durability of the log splitter, as these elements will affect its portability and longevity. Check out the fast log splitter buyers guide below to find out more about these things.

    To guide you in finding the best option, we have thoroughly researched and tested various fast log splitter on the market, focusing on their speed, efficiency, and overall performance. In this article, we present you with our top recommendations to make your log splitting tasks faster, easier, and more enjoyable.

    What Type of Log splitters are the fastest?

    Fast Log Splitter - Do you have the need for speed?
    Have the Need for Speed?

    As I began to compile this list I had my suspicions, but I wasn’t quite sure which type of splitter would actually win the ‘fast log splitter’ race.

    I quickly learned, however; that Gas Log Splitters are far and away better than any other type if you’re looking to get the job done in a hurry.

    There are a couple of sub-categories within the ‘gas’ type, being the regular hydraulic kind and the Kinetic Flywheel that results in an incredible 2.5 second cycle time with a massive 28-ton capability! However, I am steering clear of the kinetic log splitter kind as they are widely not reviewed well from users.

    Our Selection of the Best Fast Log Splitters

    We have compiled a list of the best log splitters available on the market to make your firewood preparation quicker and more efficient.

    Landworks Log Splitter Portable 20 Ton

    Landworks Log Splitter

    We recommend the Landworks Log Splitter for its powerful performance, portability, and ability to handle large logs.

    Pros

    • Powerful 7HP gas engine with 20-ton rated system
    • Portable design with 10″ sturdy transport wheels
    • Rapid Auto Return and 7.5-second cycle time for efficient splitting

    Cons

    • Not suitable for indoor use, must use outside with proper ventilation
    • Hydraulic fluid not included, need to purchase separately (AW32 recommended)
    • Some users may find it heavy at 130lbs

    The Landworks Log Splitter Portable 20 Ton impressed us with its heavy-duty 7HP gas engine and 20-ton rated system, which allowed us to effortlessly split logs up to 20.5″ in length and up to 16″ in diameter. The 2-Stage Bucher Hydraulic Gear Pump provides a smooth performance, making quick work of even the toughest logs.

    We appreciated the portable design, featuring a horizontal full beam, steel wedge, and 10″ sturdy transport wheels, which allowed us to easily transport the splitter to different job sites. Setting up the Landworks Log Splitter was fast and hassle-free.

    Safety is always a priority, and we were able to operate the log splitter with eye and hand protection while utilizing the controls and shut off/on switch as needed. Note that this log splitter is gas-powered, so it’s more versatile for outdoor applications but should only be used outside with proper ventilation.

    In conclusion, the Landworks Log Splitter is an excellent option for those who need a powerful, portable, and efficient log splitter for their outdoor wood splitting tasks. Just keep in mind that it requires outdoor use and must be used with proper safety measures.

    Champion Power Equipment 25-Ton Log Splitter

    Champion Log Splitter

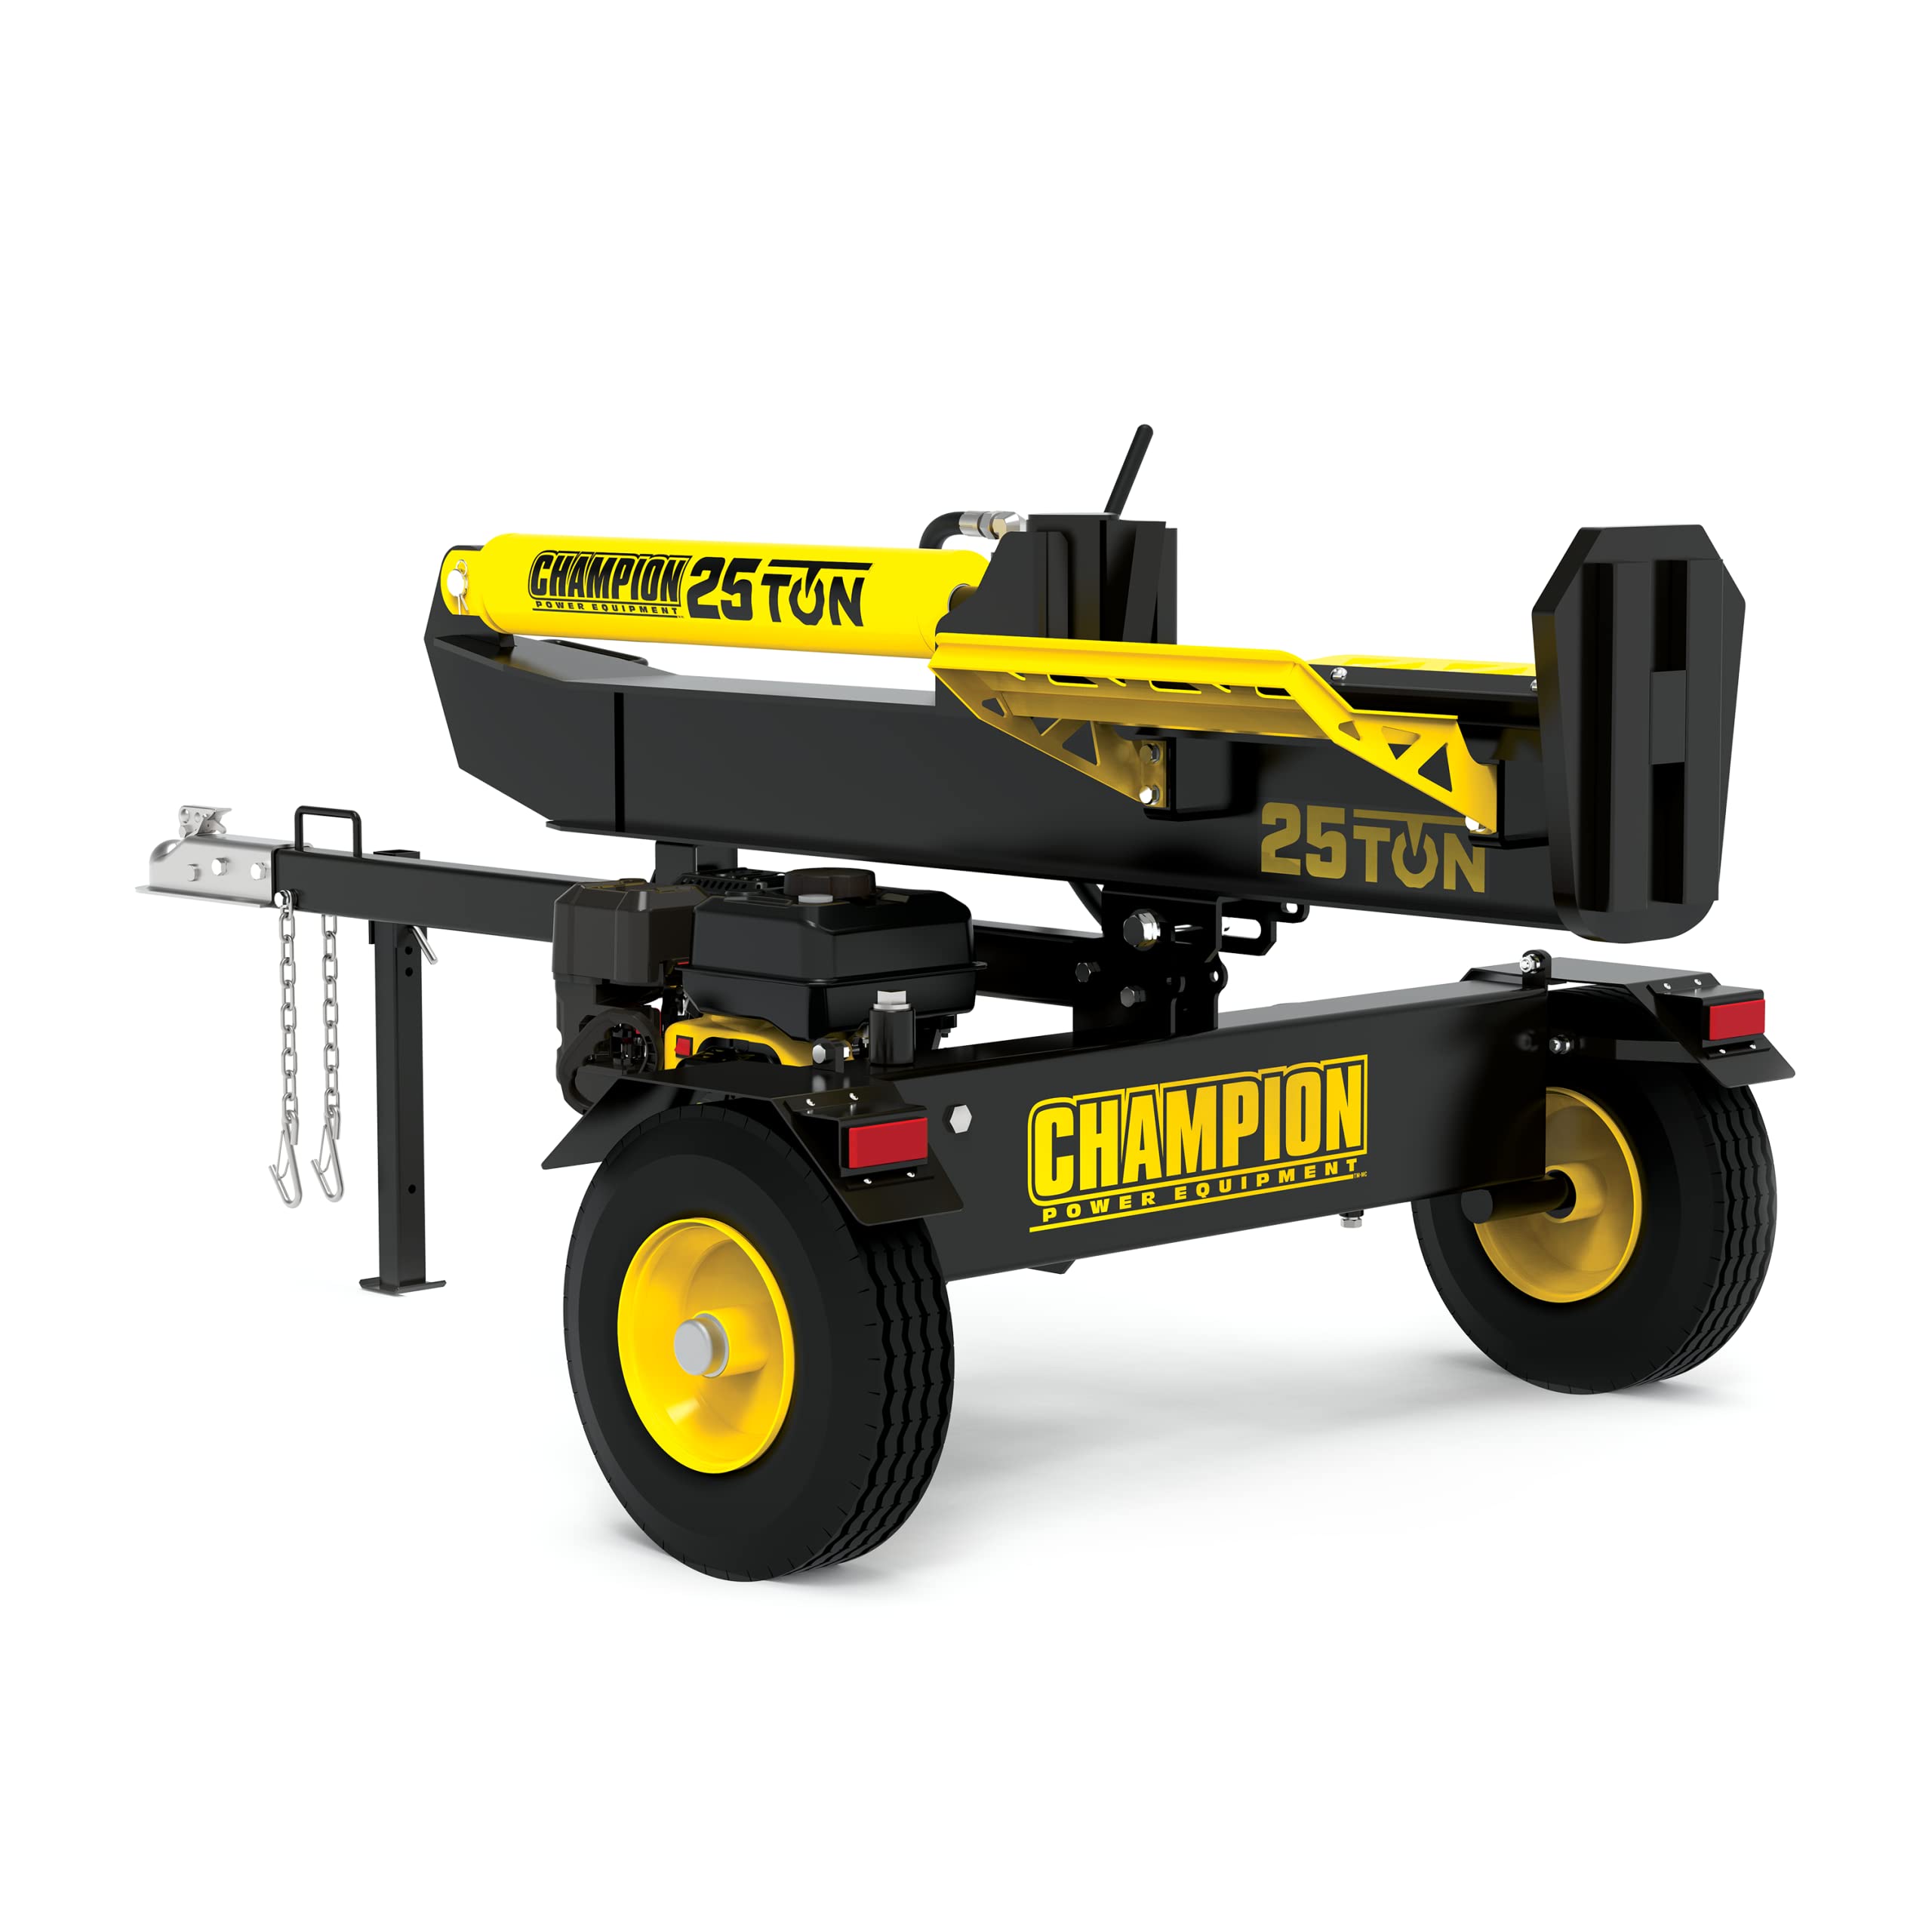
    If you’re seeking a powerful and efficient log splitter, you should definitely consider this 25-Ton splitter from Champion Power Equipment.

    Pros

    • Powerful 224cc single-cylinder OHV engine
    • Versatile horizontal and vertical orientation
    • Quick 11-second cycle time

    Cons

    • A bit on the heavier side (434 pounds)
    • May struggle with very large logs
    • Some users experienced shipping delays

    Having recently used the Champion Power Equipment 25-Ton Log Splitter, we found it to be an incredibly powerful and efficient machine. It truly made the tedious task of splitting logs much more manageable. Equipped with a large 224cc single-cylinder OHV engine, this splitter delivers dependable performance and an impressive 25 tons of splitting capacity.

    What makes this log splitter stand out is its versatility. With a quick and easy conversion between horizontal and vertical orientations, large and heavy logs can be handled with ease. The 11-second cycle time is a remarkable feature that streamlined our log splitting experience, allowing us to complete the task swiftly and move on to other activities.

    While the log splitter might be on the heavy side, weighing in at 434 pounds, it is still easily towable with DOT-approved wheels that can speed up to 45 mph. It fits most ATV/UTV towing applications, making transportation a breeze.

    One possible downside we noticed is that, despite its powerful engine, the log splitter may struggle with logs significantly larger than its 24-inch single-log capacity. Furthermore, some users reported delays in shipping which could be a factor to consider when planning one’s purchase.

    In summary, the Champion Power Equipment 25-Ton Log Splitter is an impressive machine that offers power, efficiency, and versatility for anyone looking to tackle log splitting tasks with ease. Despite a few minor limitations, we believe this log splitter is a fantastic investment for those in need of a reliable wood-splitting solution.

    Powerhorse Horizontal/Vertical Log Splitter – 22 Tons

    Powerhorse Log Splitter

    We highly recommend this Powerhorse Log Splitter for its efficiency, power, and ease of use.

    Pros

    • Powerful 22-ton splitting force
    • Horizontal and vertical splitting options
    • Easy-to-start 212cc engine

    Cons

    • Some assembly required
    • Can be difficult to maneuver by hand
    • Minor hydraulic fluid leakage reported by some users

    We recently had the opportunity to use the Powerhorse Horizontal/Vertical Log Splitter, and we were really impressed with its performance. The 22-ton splitting force made quick work of even the most challenging wood, including large rounds of sycamore and birch. Switching between horizontal and vertical splitting modes was seamless, allowing us to tackle a variety of log sizes and types.

    The 212cc engine was a pleasant surprise – it started on the first pull every time, making it incredibly easy to get to work. Despite its power, the log splitter was relatively quiet and offered a smooth operation.

    Assembling the Powerhorse Log Splitter took some time, and it was a bit intimidating at first, but following the step-by-step instructions made the process manageable. Once assembled, the splitter performed exceptionally well. However, maneuvering it by hand proved to be a bit challenging, so we recommend hooking it up to a tractor for easier transportation.

    We did experience some minor hydraulic fluid leakage, but this did not impact the overall functionality of the log splitter. Just make sure to keep an eye on it and address any leaks promptly to prevent potential damage.

    In conclusion, the Powerhorse Horizontal/Vertical Log Splitter is a reliable and efficient log splitter that can tackle a wide variety of wood types. Its powerful engine, versatility, and ease of use make it a great investment for anyone looking to make quick work of splitting logs.

    SuperHandy Portable 25 Ton Gas Log Splitter

    SuperHandy Log Splitter

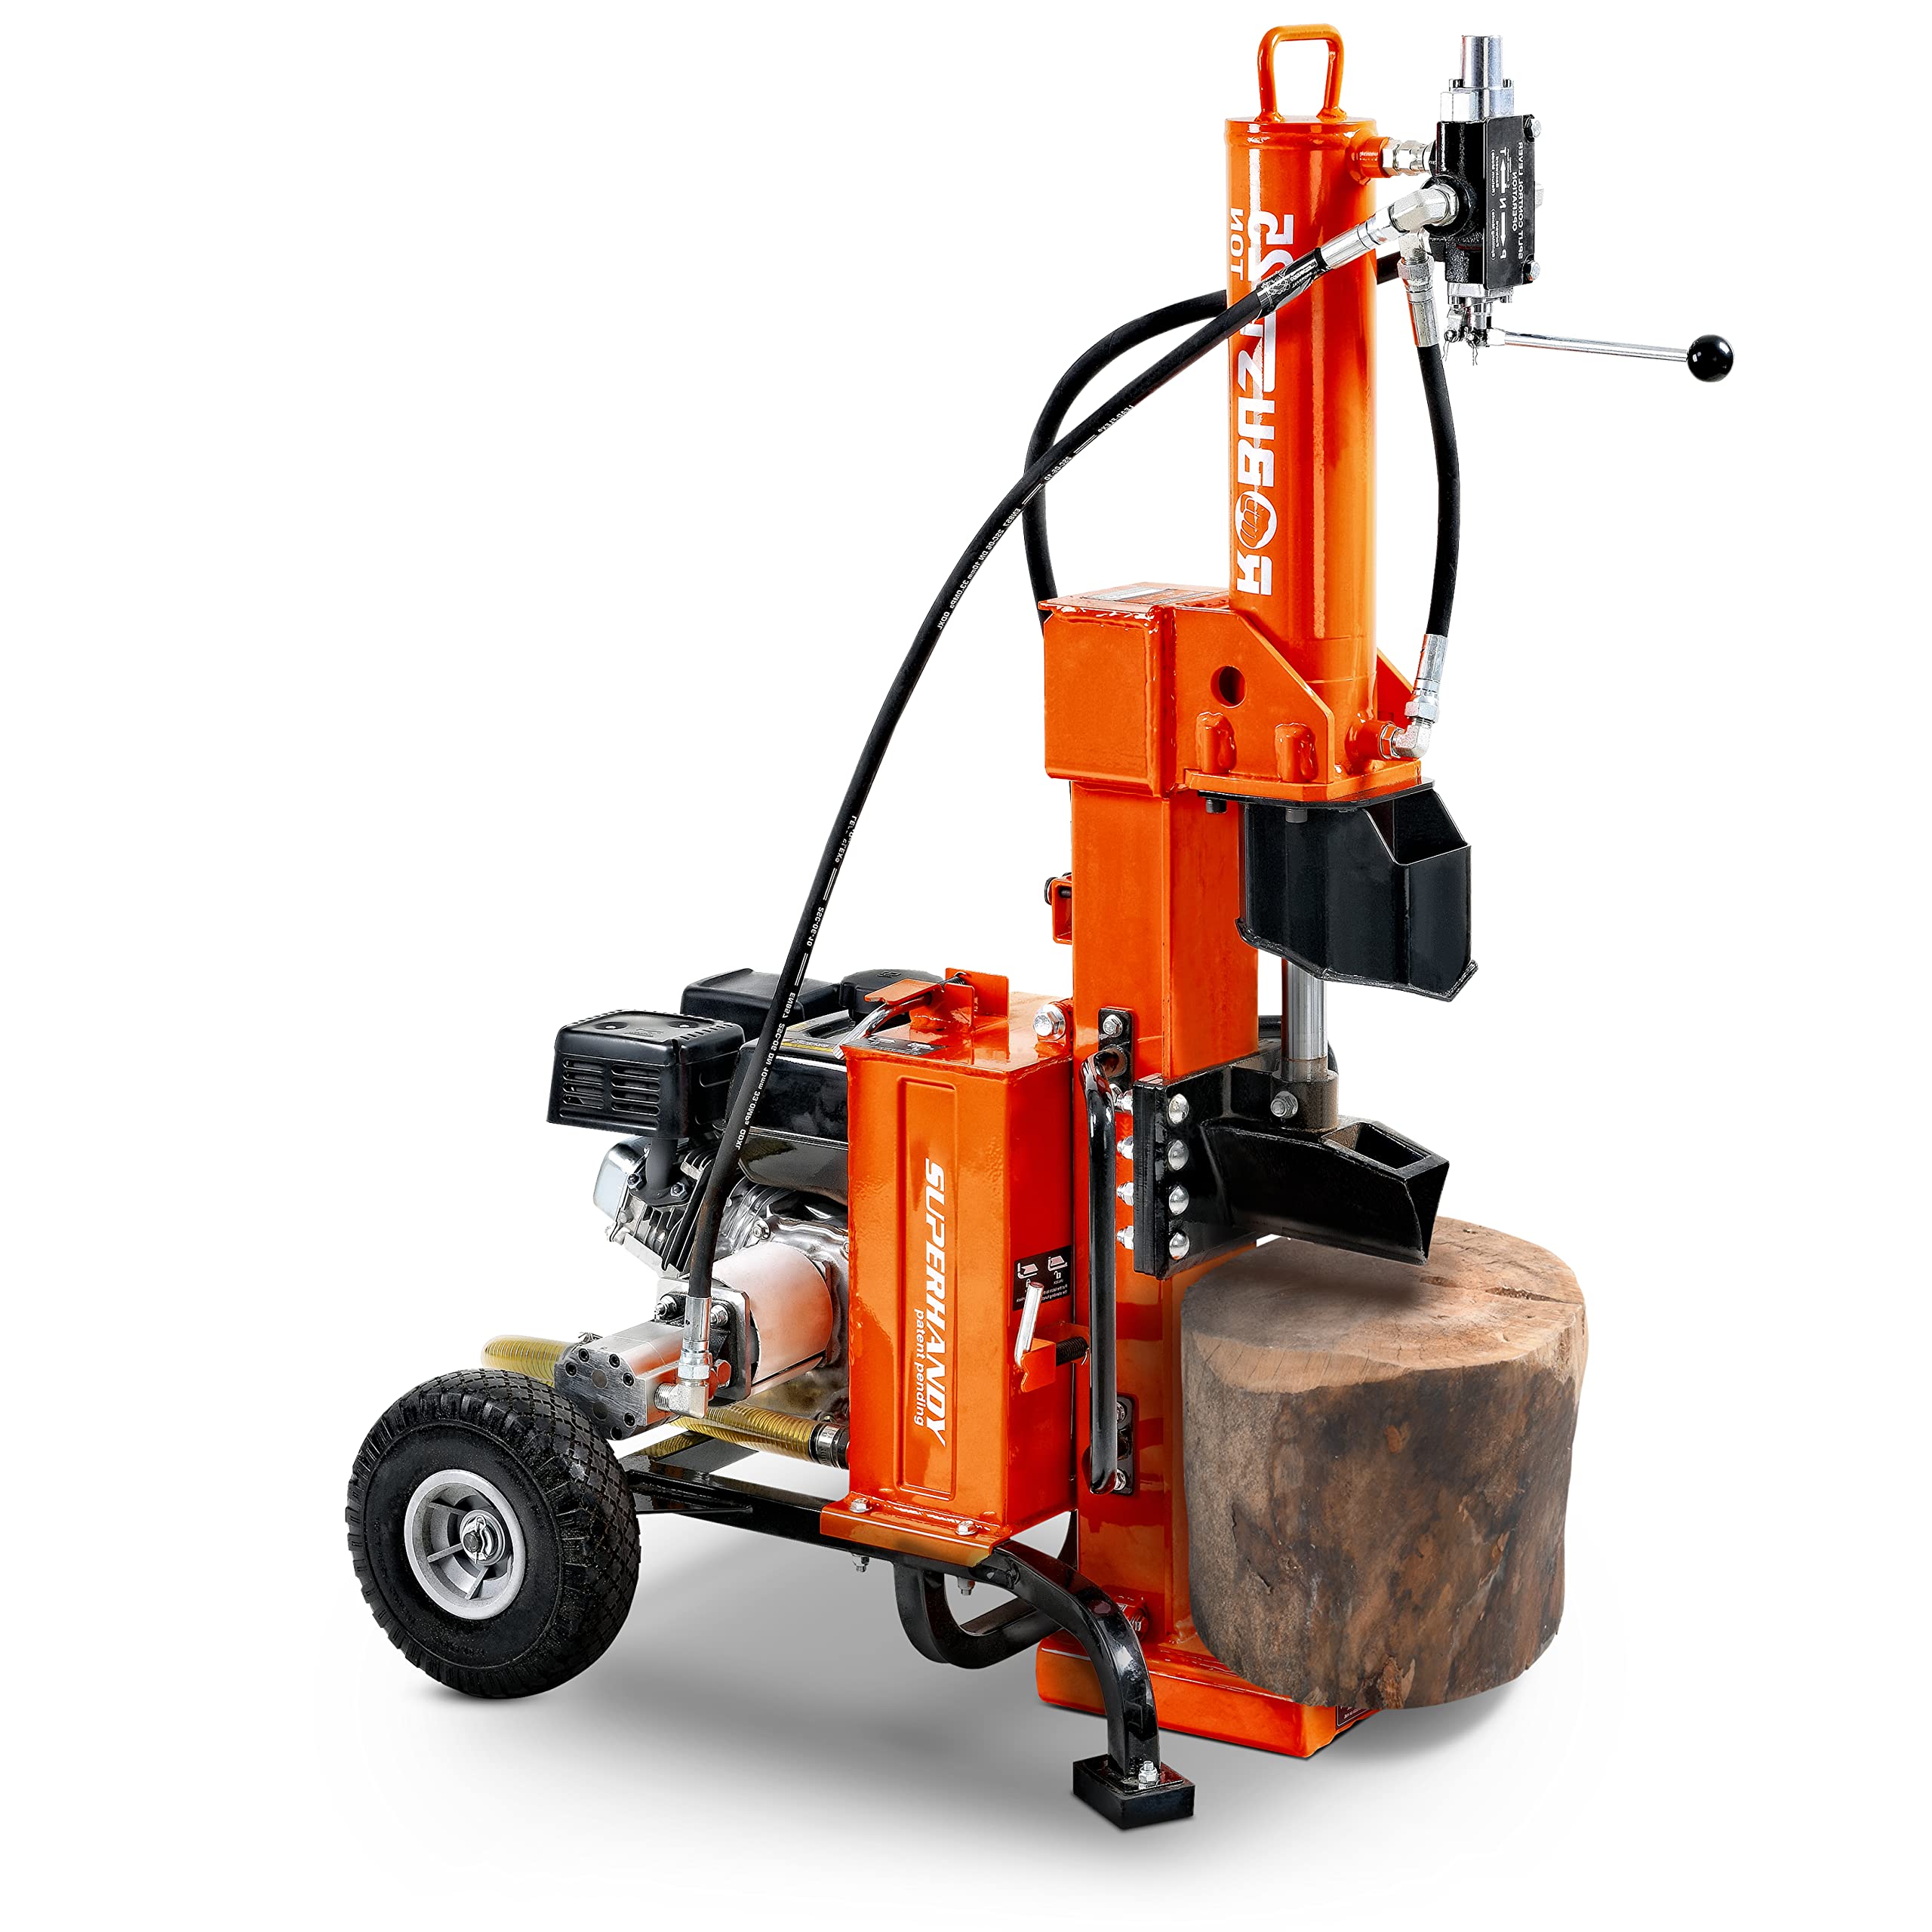
    This log splitter will efficiently and consistently tackle your firewood splitting needs with ease and power.

    Pros

    • Powerful 7HP AlphaWorks engine and 2-Stage Bucher Hydraulic Gear Pump
    • Portable design featuring lightweight half-beam and sturdy steel wedge
    • Fast 12-second cycle time and consistent force

    Cons

    • Hydraulic fluid not included and requires purchase of AW32
    • Weight of 238 pounds may still be challenging for some to move
    • Limited to 20″ length logs in horizontal mode

    We had the opportunity to use the SuperHandy Portable 25 Ton Gas Log Splitter and we found it to be a high-performance and reliable piece of equipment. The 7HP AlphaWorks engine provided smooth and unwavering power output, making short work of our wood pile. The 2-Stage Bucher Hydraulic Gear Pump added to the overall efficiency and power of the splitter.

    Portability is a key advantage of this log splitter, as it features a lightweight horizontal half-beam design, a solid steel wedge, and 10″ polyurethane tubeless wheels. Along with the ergonomic folding handle, we had no trouble maneuvering the splitter through various terrains and bringing it to different work sites.

    One important thing to note is that the hydraulic fluid is not included in the package, and you’ll need to purchase and use AW32 for optimal operation. Also, the splitter’s weight of 238 pounds may present some difficulties for users who require a lighter option.

    In terms of log size capabilities, the splitter can handle logs up to 20″ in length and 16″ in diameter in horizontal mode, and up to 24″ in diameter in vertical mode. This should be sufficient for most firewood splitting needs, but if you’re dealing with larger logs, it may not be the best choice for you.

    In conclusion, the SuperHandy Portable 25 Ton Gas Log Splitter is an effective and convenient option for those who require a powerful, portable log splitter for their firewood processing needs. The combination of the powerful engine, hydraulic gear pump, and easy maneuverability make it a great choice for most users.

    Splitter Buying Guide

    When looking for a fast log splitter, there are several factors to consider to ensure we choose the best product suited for our needs. Here’s a handy buying guide to help us make an informed decision.

    Power Source of the Log Splitter

    First, consider the power source of the log splitter. There are three main types: manual, electric, and gas. Manual splitters are labor-intensive but do not require electricity or fuel. Electric splitters are efficient and produce less noise compared to gas splitters. However, gas splitters generally provide more power and can handle larger logs. We need to assess our splitting needs and choose accordingly.

    Splitting Force

    Splitting force is a crucial factor when considering which log splitter to purchase. These specifications refer to the power of the machine and the size of the logs it can handle.

    The splitting force of a log splitter is typically measured in tons. This is essentially the amount of force that the machine can exert to split the log. Log splitters on the market usually range from 4 to 25 tons of force.

    A 4-ton log splitter is sufficient for small, dry logs or woods that are softer and less dense, such as pine or cedar. These are ideal for residential use, such as for splitting firewood for a small fireplace or wood-burning stove.

    On the other end of the spectrum, a 25-ton log splitter can handle much larger, harder, and wet logs. This is the kind of splitter you would need for commercial operations or regular heavy-duty residential use. Hardwoods like oak, hickory, or maple, especially when they’re large or still green (wet), require a lot of force to split.

    Understanding the type and size of the logs you’ll be dealing with is crucial in determining the right tonnage. It would be overkill to use a 25-ton log splitter for small, soft logs, while a 4-ton splitter would struggle with large hardwood logs.

    Log Splitter Capacity

    Capacity, on the other hand, refers to the maximum size of the log that the machine can accommodate. This is usually expressed in terms of the length and diameter of the log. Higher capacity log splitters can handle longer and wider logs.

    For instance, some residential-grade log splitters can accommodate logs up to 20 inches long and 12 inches in diameter. Commercial-grade machines can handle logs over 25 inches long and 18 inches in diameter.

    Keep in mind that a log splitter with higher splitting force will usually have a larger capacity. However, this isn’t always the case. So, it’s important to check both specifications when purchasing a log splitter.

    Splitting ForceCapacityBest For
    4-Ton Log Splitter4 tonsLogs up to 12 inches in diameter and 16 inches longSmall, dry logs, softer woods like pine and cedar; Residential use for small fireplace or stove
    10-Ton Log Splitter10 tonsLogs up to 15 inches in diameter and 20 inches longMedium-sized logs, mix of soft and hardwoods; Residential or light commercial use
    15-Ton Log Splitter15 tonsLogs up to 18 inches in diameter and 22 inches longLarger logs, most hardwoods; Regular residential or commercial use
    25-Ton Log Splitter +25 tons +Logs over 18 inches in diameter and 25 inches longLarge, hard, or wet logs, dense hardwoods like oak, hickory, or maple; Heavy-duty or commercial use

    Please note that these values are estimates, actual specifications can vary based on the model and manufacturer. It’s always best to check the product details of the log splitter before purchasing.

    To sum up, understanding your own needs is crucial when selecting a log splitter. Assess the type of wood, the size, and the frequency of use before you make a decision. This way, you can ensure that you get a log splitter with the right splitting force and capacity for your needs.

    What is Log Splitter Cycle Time?

    OK, so cycle time is the measurement you’re after. This metric represents the time it takes for the hydraulic ram to push the log/wood into the splitter and then return to its initial starting position. This time varies between machines and is one of the key questions you should be asking before you make a purchase – particularly if you have a large pile of logs to split in a short amount of time.

    Some of the higher-end log splitters sport cycle times as low as 10 seconds, making short work of any pile. Unfortunately, not all log splitters have this metric written down somewhere so you often need to ask the question when you are searching.

    We have done a bit of research for you and listed the cycle times of some of the fastest log/wood splitters we could find.

    Log Splitter Portability

    Portability is another factor to weigh when choosing a log splitter. Some models are designed with wheels and detachable parts, making them easy to transport and store. It’s essential to consider how often we’ll need to move our log splitter and what our storage options are when not in use.

    Log Splitter Build Quality

    Lastly, it’s crucial to evaluate the build quality and safety features of the log splitter. Some essential safety features include two-handed operation, log cradle, and safety chains. A well-built log splitter with high-quality materials and durability will ensure a long-lasting and safe splitting experience.

    In conclusion, by considering the power source, splitting force and capacity, cycle time, portability, and safety features, we can find the ideal log splitter to suit our needs.

    Frequently Asked Questions

    Fastest log splitter cycle time?

    When it comes to the fastest log splitter cycle time, we have seen some models with cycle times as quick as 3-4 seconds. These are typically gas-powered splitters that can handle large volumes of logs efficiently. However, it’s essential to consider your specific needs and preferences when choosing a log splitter, as factors such as power source and portability may also be important.

    Best log splitter on market?

    There are many excellent log splitters available on the market, making it difficult to pinpoint a single “best” option. Factors such as power source, splitting force, cycle time, portability, and budget all come into play when choosing the ideal log splitter for your needs. We recommend conducting thorough research and considering user reviews before making a purchase.

    Capacity of 25-ton splitter?

    A 25-ton log splitter has the capacity to handle logs with a diameter of up to 24 inches and a length of up to 26 inches, depending on the specific model. This makes it suitable for homeowners with substantial volumes of logs to split. However, if you’re splitting exceptionally hard or knotty wood, you may want to consider a higher-tonnage model for maximum efficiency.

    Manual vs hydraulic splitters?

    Manual log splitters rely on human force, usually through a lever system, to split logs. They are generally more affordable, lightweight, and portable compared to hydraulic splitters. However, manual splitters can be slower and more physically demanding to operate. Hydraulic splitters use a hydraulic pump to exert pressure on the log, requiring less physical effort from the operator and offering faster, more efficient performance. Hydraulic splitters are available in both electric and gas-powered models.

    What is Eastonmade Ultra?

    The Eastonmade Ultra is a line of log splitters designed and manufactured by Eastonmade Wood Splitters. These high-quality machines are built with durability and performance in mind, offering impressive cycle times and splitting forces. The Eastonmade Ultra series includes models with various tonnages, catering to various log splitting needs, from residential to commercial use.

    Average wood splitter price?

    Log splitter prices can vary greatly depending on factors such as tonnage, power source, and brand. Generally, you can expect to pay anywhere from $100 to $200 for a simple manual splitter, while electric models can range from $300 to $1,000. Gas-powered hydraulic splitters can range from $1,000 to $3,000 or more for heavy-duty, high-tonnage models. Keep in mind that these are average price ranges, and it’s essential to compare specific models based on your unique requirements.

    What is the fastest log splitter?

    The speed of a log splitter depends on its cycle time, which is the total time it takes for the splitting wedge to extend, split the log, and then retract. The fastest log splitters generally have a cycle time of around 10-15 seconds. Various models from brands such as Champion, Boss Industrial, and Swisher often feature among the fastest in the market. However, the exact model considered as the “fastest” can vary based on the latest releases. Always check the cycle time specified by the manufacturer to determine the speed of a log splitter.

    How fast can a log splitter go?

    The speed of a log splitter is typically determined by its cycle time, which is how quickly the machine can split a log and reset for the next one. Cycle times can vary widely based on the splitter’s design and power, ranging from around 10 seconds to over a minute. The fastest log splitters on the market typically have cycle times of around 10-15 seconds. Remember that while faster cycle times can increase productivity, they may also require more power and potentially sacrifice some degree of control, which could be a safety concern.

    What is the most powerful log splitter?

    The power of a log splitter is measured by its splitting force, which is generally expressed in tons. The most powerful log splitters available in the consumer market generally offer around 25-35 tons of force, able to split large, hard, or wet logs. Brands such as NorthStar, Champion, and Boss Industrial often produce high-tonnage log splitters. However, remember that more power isn’t always better – it’s more important to match the power of your log splitter to the size and hardness of the logs you’ll be splitting.

    How can I speed up my log splitter?

    Increasing the speed of your log splitter largely depends on its design and specifications. However, there are a few general tips to help speed up the process:
    Keep the hydraulic fluid clean and topped up. This ensures smooth operation of the hydraulic piston, which controls the splitting wedge.
    Sharpen the splitter’s blade or wedge regularly for more efficient splitting.
    Position logs correctly and uniformly for a smoother splitting process.
    For manual or electric splitters, use an extension cord that is heavy-duty enough to carry the current required by the machine. Underpowered machines tend to run slower.
    However, always remember that safety is paramount when operating log splitters. Trying to excessively speed up the process could lead to accidents.

  • How to Sharpen an Axe – How to achieve a Razor Sharp Axe

    How to Sharpen an Axe – How to achieve a Razor Sharp Axe

    Hey there, this is Jim ‘The Lumberjack’.

    I’m here to teach you how to sharpen an axe, a key skill that’ll make your outdoor work a lot more efficient.

    No need to wrestle with a dull edge when a bit of elbow grease and know-how can have your axe cutting clean and true. It’s all about taking your time, using the right tools, and following the grain of good sense – just like splitting a seasoned log.

    So roll up your sleeves, folks, and let’s get to it—because there’s nothing quite like the feel of a well-sharpened axe in your hands.

    How to sharpen an axe - A quick Guide to results

    Common Mistakes in Axe Sharpening: What to Avoid

    As with anything, how to sharpen an axe can have its pitfalls. Here are a few you’d do well to avoid:

    • Sharpening your axe when it’s not needed: An axe isn’t like a razor; it doesn’t need to be hair-splitting sharp. Over-sharpening can actually weaken the edge and increase the need for more frequent maintenance.
    • Ignoring the angle: The bevel angle is crucial when sharpening an axe. Too steep, and you’ll end up with a durable but dull edge. Too shallow, and you’ll get a sharp but fragile edge that chips easily.

    Rushing the Process: Why Patience is a Virtue in Axe Sharpening

    Don’t rush when you’re sharpening an axe. You’re not just honing metal; you’re crafting an edge. The process takes time, and each step needs to be done carefully and precisely. The end result is worth the extra attention to detail.

    How to Sharpen an Axe or Hatchet

    Wrong Tool, Wrong Time: Choosing the Correct Sharpening Tool

    Image Description: A diagram showing the main points on an axe.
Creator: RainbowRed
Source: Wikipedia
License: Free Art License

    One of the biggest mistakes in how to sharpen an axe is using the wrong tool at the wrong time. Here’s a basic guide:

    • Filing: This is for when your axe edge is significantly dull or has nicks. A file removes more material and can quickly reshape the edge.
    • Sharpening stone: Once your edge is shaped, the stone refines it, removing the scratches left by the file and honing a sharper edge.
    • Strop: This is the final touch. It aligns any leftover microscopic burrs, giving your axe that razor-sharp edge.

    Over-sharpening: A Surprising Mistake

    The goal of axe sharpening isn’t to get the sharpest edge possible; it’s to get the sharpest edge that will last. Over-sharpening can lead to an edge that’s razor sharp but brittle and more prone to chipping or rolling.

    Maintaining Your Axe’s Edge: Post-Sharpening Care

    Just as important as the sharpening process is taking care of the axe afterwards. Here are some tips to help your axe stay sharp longer:

    • Clean your axe after use: Simple, but crucial. Dirt and moisture are the enemies of your axe edge.
    • Oil the axe head: This prevents rust and keeps your axe in top condition.
    • Store your axe properly: Keep it somewhere dry, and cover the edge to protect it.

    Proper Cleaning: Protecting Your Axe after Sharpening

    After you’ve spent all that time sharpening, don’t let your hard work go to waste. Cleaning off any leftover metal filings and applying a light coating of oil protects your axe from rust and helps maintain the edge.

    Storing Your Axe: Where and How to Keep Your Axe

    Your axe isn’t a toy and shouldn’t be left lying around.

    An axe rack or magnetic tool bar is a good option for storing your axe. This keeps the axe edge from coming into contact with anything that might dull it.

    Expert Tips: Elevate Your Axe Sharpening Skills

    By now, you’re probably starting to feel like a bit of an expert yourself, but here’s a couple more tips on how to sharpen an axe to really up your game:

    • Always maintain control: Keep your sharpening tools and the axe steady when sharpening. Any slipping can result in an inconsistent edge or even an injury.
    • Don’t forget the handle: While the axe head gets all the attention, a good handle is just as important for effective axe use.
    how to sharpen an axe and maintain it so that it stays sharp

    Sharpening Angles: Finding the Sweet Spot

    Every axe and usage has its ideal sharpening angle, and finding this is more of an art than a science. A general guideline is 25-30 degrees for a chopping axe, and 20-25 degrees for a carving or splitting axe. Remember, the steeper the angle, the more durable but less sharp the edge will be.

    Reading the Burr: Advanced Axe Sharpening Tips

    After using your sharpening stone, run your fingers carefully along the edge of the axe. You should be able to feel a slight burr or lip of metal. This indicates that the edge is fully sharpened. Once you feel this burr along the entire edge, it’s time to stop sharpening and start honing.

    Regular Maintenance: Keeping Your Axe Sharp

    Regular maintenance is the key to keeping your axe sharp and ready for action. Don’t wait for your axe to become dull before you decide to sharpen it.

    A quick touch up after each use can make a big difference and prolong the periods between full sharpening sessions.

    The Journey to Axe Sharpening Mastery

    Sharpening an axe is as much about the journey as the destination. As you spend time with your axe, getting to know its quirks and temperaments, you’ll find yourself becoming more in tune with it. It becomes not just a tool, but an extension of yourself. So, remember, keep your axe sharp and it’ll never let you down. And whenever you hear the question, “how to sharpen an axe,” you’ll always have a story to tell.

  • Troubleshooting: Why Won’t My Log Splitter Engine Start?

    Troubleshooting: Why Won’t My Log Splitter Engine Start?

    Howdy, folks.

    Jim ‘The Lumberjack’ here.

    Now, if you’re someone who leans heavily on a log splitter for your firewood, there’s nothing that brings on a frown faster than an engine that just won’t start. It can be a real inconvenience, and might even run up a hefty repair bill, especially if you’re not well-acquainted with the mechanics of these machines.

    So it’s a fair question, ‘why won’t my log splitter engine start?’

    But fear not, I’m here to help you troubleshoot, and get that log splitter back in action.

    One of the main reasons a log splitter engine might refuse to start is due to an issue with the fuel.

    If the tank’s as dry as a bone, or if the fuel has aged and become contaminated, the engine won’t be able to pull fuel into the combustion chamber.

    Another common troublemaker is a dirty carburetor which could block fuel from reaching the engine. The good news is that these problems can be easily fixed – by simply refilling the fuel tank or giving the carburetor a good clean.

    Troubleshooting Tips

    Why Won't My Log Splitter Engine Start? It can be frustrating!

    However, if you still find yourself asking ‘why won’t my log splitter engine start?’, there could be other underlying issues at play.

    I know it can feel like you’re up a creek without a paddle when that log splitter won’t start. But before you haul it off to a professional, there are a few things you can check on your own.

    Here’s some advice that might help you find and fix the problem:

    Eyeballing the Fuel Line

    The fuel line’s job is to deliver gasoline to the engine.

    If it’s blocked up or leaking, well, your log splitter is going to sit there quieter than a mouse. Take a look at the fuel line for any visible damage or leaks. If you spot any, it’s time to replace the line.

    And don’t forget to check there’s enough gasoline in the tank, and that it’s fresh. A tank full of old, stale gas can stop your engine from firing up too.

    Giving the Spark Plug a ‘Once Over’

    This little component may not look like much, but it’s a key player in your engine’s operation.

    Its job?

    It sets the stage for combustion in the engine. It generates a spark that ignites the fuel-air mixture, which in turn drives the engine.

    Think of the spark plug as the match that lights the campfire. Without that spark, the fuel in the engine won’t ignite, and your log splitter will remain as silent as a sleeping bear.

    Over time, just like anything else that works hard, the spark plug can start to show signs of wear and tear. It can get dirty or damaged, and that’s not good news for your log splitter.

    If the spark plug is dirty, it might not generate a strong enough spark to ignite the fuel. If it’s damaged, it might not spark at all.

    ACTION STEP:

    Pull out the spark plug – carefully, mind you – and give it a good look-over. If you see any signs of wear, like cracks or chips, or if there’s a buildup of carbon (that’s the black, sooty stuff), then it’s time for a change.

    Replacing a spark plug isn’t as hard as trying to catch a trout with your bare hands. It’s actually pretty straightforward. Just make sure you replace it with a new one that’s right for your specific log splitter model.

    Keep an eye on your spark plug, maintain it well, and it’ll help keep your log splitter running as smoothly as a river in springtime. Remember, a well-maintained spark plug is key to a well-functioning log splitter.

    Checking the Air Filter

    The air filter’s the gatekeeper, stopping dirt and debris from barging into your engine.

    If it’s clogged up or dirty, it can choke off the engine’s air supply and stop it from starting.

    ACTION STEP:

    Pull out the air filter and see if it’s dirty or damaged. If it is, give it a good cleaning or just replace it.

    Inspecting the Carburetor

    The carburetor’s the little mixer that blends air and gasoline to make a combustible cocktail. If it’s dirty or blocked, it’s going to stop your log splitter from starting.

    ACTION STEP:

    Take off the carburetor and clean it up with carburetor cleaner. If it’s seen better days, replace it.

    Testing the Battery

    For those of you with electric log splitters, the battery’s your power source. If it’s dead or not feeling too well, your log splitter isn’t going to start.

    ACTION STEP:

    Give the battery a check and make sure it’s got a full charge. If it’s running low, charge it up – or even jump start it from another battery or jump starter – we recommend these two products:

    This is a trickle charger that you can set and forget and it will maintain the health of your battery:


    Check Price and Availability

    This is a well rated and reviewed portable battery charger that you can even use on your car, not just your log splitter battery


    Check Price and Availability

    In addition to these tips, remember that cold weather can make starting a gas engine tougher than chewing jerky. If you’re wrestling with your log splitter in freezing temps, consider using a block heater or warming up the engine with a hairdryer. And always double-check you’re using the right kind of gasoline for your machine.

    By following these tips, you might be able to pinpoint and fix some of the usual suspects that stop your log splitter from starting. If you’re still having a tough time, it might be best to take it to a professional for a more thorough look.

    Maintaining Your Log Splitter

    Maintaining your hydraulic log splitter is crucial to ensure that it stays in good working condition and to prevent potential problems with the engine starting. Here are some steps you can take to maintain your log splitter:

    Changing the Hydraulic Oil and Filters

    One of the most important steps in maintaining your log splitter is changing the hydraulic oil and filters. Over time, the oil can become contaminated with dirt, debris, and water, which can cause damage to the hydraulic pump, seals, and valves. It is recommended to change the hydraulic oil and filters at least once a year or after every 100 hours of use.

    To change the hydraulic oil and filters, follow these steps:

    1. Turn off the engine and let it cool down.
    2. Place a container under the hydraulic oil tank to catch the old oil.
    3. Remove the drain plug and drain the old oil into the container.
    4. Replace the drain plug and remove the old filter.
    5. Install a new filter and refill the tank with fresh hydraulic oil.
    6. Start the engine and run it for a few minutes to circulate the new oil.
    7. Check the oil level and add more if necessary.

    Inspecting the Pump and Seals

    The hydraulic pump and seals are essential components of your log splitter. They are responsible for generating the pressure needed to split logs. Over time, the pump and seals can wear out, which can cause leaks and loss of pressure. It is recommended to inspect the pump and seals regularly and replace them as needed.

    To inspect the pump and seals, follow these steps:

    1. Turn off the engine and let it cool down.
    2. Remove the hydraulic pump from the log splitter.
    3. Inspect the pump for any signs of wear or damage, such as cracks or leaks.
    4. Inspect the hydraulic pump seals for any signs of wear or damage, such as cracks or leaks.
    5. Replace any damaged or worn parts as needed.

    Checking the Recoil Starter Assembly

    The recoil starter assembly is responsible for starting the engine of your log splitter. Over time, the recoil starter assembly can become worn or damaged, which can prevent the engine from starting. It is recommended to check the recoil starter assembly regularly and replace it if it is broken or not working properly.

    To check the recoil starter assembly, follow these steps:

    1. Remove the recoil starter assembly from the engine.
    2. Inspect the recoil starter assembly for any signs of wear or damage, such as broken or worn out parts.
    3. Replace any damaged or worn out parts as needed.
    4. Reinstall the recoil starter assembly and try starting the engine.

    By following these maintenance steps, you can help keep your log splitter in good working condition and prevent potential problems with the engine starting. Remember to always refer to the manufacturer’s instructions and safety guidelines before performing any maintenance on your log splitter.

    Common Problems and Solutions

    As a log splitter owner, I have faced several problems with my engine not starting. Here are some common problems and solutions that I have come across:

    Clogged Air Filter

    A clogged air filter can prevent air from entering the engine, causing it not to start. To solve this problem, I first turn off the engine and remove the air filter. Then I clean it with compressed air or replace it with a new one if it is too dirty.

    Bad Spark Plug

    A bad spark plug can cause the engine not to start or run poorly. To check if the spark plug is bad, I use a spark plug tester or remove the plug and inspect it for damage. If it is damaged, I replace it with a new one.

    Dirty Carburetor

    A dirty carburetor can cause the engine not to start or run poorly. To solve this problem, I first turn off the engine and remove the carburetor. Then I clean it with carburetor cleaner and a small brush.

    Flooded Engine

    If the engine is flooded, it means that too much fuel has entered the engine, preventing it from starting. To solve this problem, I first turn off the engine and remove the spark plug. Then I pull the starter cord several times to remove the excess fuel. After that, I clean or replace the spark plug and try to start the engine again.

    Blowing a Fuse

    If the log splitter is blowing a fuse, it could be due to a problem with the outlets, extension cord, voltage meter, charging circuit, or other electrical components. To solve this problem, I first check the outlets and extension cord to ensure they are in working order. Then I use a voltage meter to check the electrical components for any issues. If I find any problems, I replace or repair the faulty components.

    These are some common problems and solutions that I have come across as a log splitter owner. Other possible issues that could prevent the engine from starting include being low on hydraulic oil, having a dirty air filter, or having old or bad gasoline in the engine fuel tank. If you encounter any of these problems, be sure to address them promptly to keep your log splitter running smoothly.

    Log Splitter Repair

    As an experienced log splitter owner, I have encountered several issues that can cause the engine to fail to start. One of the most common issues is a problem with the hydraulic system. In this section, I will discuss the steps to replace some of the key components of the hydraulic system, including the pump coupler, hydraulic control valve, hydraulic cylinder, and hydraulic pump.

    Replacing the Pump Coupler

    If the engine is running but the hydraulic pump is not working, it could be due to a broken pump coupler. To replace the coupler, follow these steps:

    1. Turn off the engine and disconnect the spark plug wire.
    2. Remove the bolts that attach the pump to the engine.
    3. Slide the pump off the engine shaft.
    4. Remove the old coupler and install the new one.
    5. Reinstall the pump and tighten the bolts.

    Replacing the Hydraulic Control Valve

    If the hydraulic system is not working properly, it could be due to a bad hydraulic control valve. To replace the valve, follow these steps:

    1. Turn off the engine and disconnect the spark plug wire.
    2. Remove the hoses from the valve.
    3. Remove the bolts that attach the valve to the splitter frame.
    4. Install the new valve and tighten the bolts.
    5. Reconnect the hoses.

    Replacing the Hydraulic Cylinder

    If the hydraulic system is not working properly, it could be due to a bad hydraulic cylinder. To replace the cylinder, follow these steps:

    1. Turn off the engine and disconnect the spark plug wire.
    2. Remove the hoses from the cylinder.
    3. Remove the bolts that attach the cylinder to the splitter frame.
    4. Install the new cylinder and tighten the bolts.
    5. Reconnect the hoses.

    Replacing the Hydraulic Pump

    If the hydraulic system is not working properly, it could be due to a broken hydraulic pump. To replace the pump, follow these steps:

    1. Turn off the engine and disconnect the spark plug wire.
    2. Remove the bolts that attach the pump to the engine.
    3. Slide the pump off the engine shaft.
    4. Install the new pump and tighten the bolts.
    5. Reinstall the pump and tighten the bolts.

    In conclusion, if your log splitter’s engine is not starting, it could be due to a problem with the hydraulic system. By following the steps outlined above, you can easily replace some of the key components of the hydraulic system, including the pump coupler, hydraulic control valve, hydraulic cylinder, and hydraulic pump.

    Preventing Future Problems

    As a log splitter owner, I know how frustrating it can be when the engine won’t start. However, there are some steps I can take to prevent this from happening in the future. Here are some things I’ve learned:

    Reading the Instruction Manual

    Before operating the machine, I always make sure to read the instruction manual carefully. This helps me understand how to use the log splitter safely and efficiently. It also provides valuable information on how to troubleshoot problems that may arise.

    Regular Maintenance

    Maintaining the log splitter is essential for preventing future problems. I make sure to follow the maintenance schedule outlined in the instruction manual. This includes changing the oil, checking the air filter, and inspecting the spark plug. Regular maintenance ensures that the log splitter is running smoothly and efficiently.

    Awareness of Operating Conditions

    I always pay close attention to the operating conditions when using the log splitter. This includes checking the fuel level, making sure the spark plug is connected properly, and ensuring that all the safety features are engaged. I also make sure to operate the machine on a level surface and avoid using it in wet or muddy conditions.

    If I encounter any problems with my log splitter, I know that customer support is available to help me troubleshoot the issue. By following these steps, I can prevent future problems and ensure that my log splitter runs smoothly for years to come.

    Conclusion

    In this article, I have discussed some of the most common reasons why a log splitter’s engine may not start. These include issues with the fuel tank, spark plug, safety features, battery, carburetor, and more. By following the troubleshooting tips provided in this article, you can diagnose and fix many of these issues on your own.

    It is important to note that some issues, such as a leaky head gasket or damaged sump gasket, may require professional log splitter repair. If you suspect that your log splitter has a more serious issue, it is best to consult a professional.

    Regular maintenance can also help prevent issues with your log splitter’s engine. This includes checking the oil level and replacing the oil as needed, inspecting the spark plug and replacing it if necessary, and checking the carburetor seals for signs of wear or damage.

    Overall, troubleshooting and repairing a log splitter’s engine can be a challenging task, but with the right tools and knowledge, it is possible to get your log splitter up and running again.

    Frequently Asked Questions

    What could be causing my log splitter’s engine to not start?

    There are several reasons why your log splitter’s engine may not start. Some common causes include a dirty carburetor, failed spark plug, bad gasoline, stale gas, and more. If you’ve left the gas in the fuel tank for over 6 months without adding a fuel stabilizer or the recoil starter isn’t spinning the engine, it could create ignition issues.

    How can I troubleshoot my log splitter’s engine not starting?

    If your log splitter’s engine won’t start, there are several things you can do to troubleshoot the problem. First, check the fuel tank to make sure it has enough gas and that the gas is not stale. Next, check the spark plug to see if it’s dirty or worn out. You can also check the carburetor to make sure it’s clean and functioning properly.

    What should I check if my log splitter won’t start?

    If your log splitter won’t start, there are several things you should check. First, check the fuel tank to make sure it has enough gas and that the gas is not stale. Next, check the spark plug to see if it’s dirty or worn out. You can also check the carburetor to make sure it’s clean and functioning properly. Additionally, check the air filter to make sure it’s clean and not clogged.

    Why does my log splitter’s engine start and then die?

    If your log splitter’s engine starts and then dies, it could be due to a variety of issues. One common cause is a clogged carburetor, which can prevent fuel from reaching the engine. Another possible cause is a dirty air filter, which can limit airflow to the engine. Additionally, a faulty ignition coil or spark plug could cause the engine to start and then die.

    What could be causing my manual hydraulic log splitter to not start?

    If your manual hydraulic log splitter won’t start, there are several possible causes. First, check the fuel tank to make sure it has enough gas and that the gas is not stale. Next, check the spark plug to see if it’s dirty or worn out. You can also check the carburetor to make sure it’s clean and functioning properly. Additionally, check the hydraulic fluid to make sure it’s at the right level and not contaminated.

    How can I diagnose a no spark issue with my log splitter’s engine?

    If your log splitter’s engine is not producing a spark, there are several things you can do to diagnose the problem. First, check the spark plug to see if it’s dirty or worn out. You can also check the ignition coil to make sure it’s functioning properly. Additionally, check the wiring and connections to make sure they’re not damaged or loose.

  • How to Use an Axe. A No Nonsense Guide to NOT Bleeding Out.

    How to Use an Axe. A No Nonsense Guide to NOT Bleeding Out.

    I’ll tell you straight,

    If you’re the kind that loves the smell of fresh-cut wood and the satisfying ‘thwack’ of a well-placed swing, you’ve come to the right place.

    We’re talking about how to use an axe today, and it’s more than just swinging haphazardly and hoping for the best.

    Why Every Outdoorsman Should Know How to Use an Axe

    In my years in the great outdoors, I’ve learned one thing for sure – knowing how to use an axe isn’t just for chopping firewood. It’s a versatile tool that’s been serving us since time immemorial. Clearing a trail, setting up camp, even in emergencies – a trusty axe is an outdoorsman’s best friend.

    Understanding Your Axe: More Than Just a Chopping Tool

    Now, let’s get down to brass tacks.

    • Types of Axes: The Right Tool for the Right Job
      A felling axe for taking down trees, a splitting maul for making firewood, or a hatchet for carving and kindling – there’s an axe for every need.
    • Anatomy of an Axe: Getting Familiar with Your Equipment
      Understanding your tool is crucial. From the cutting edge to the butt, every part of the axe serves a purpose. This understanding will give you the edge you need when it comes to wielding your axe efficiently.

    Choosing the Right Axe for You: Factors to Consider

    How to use an axe - First you need to find the right one!
    • Size Matters: How to Choose the Right Length and Weight
      Like a good pair of boots, your axe needs to fit you well. Your strength, height, and the task at hand will determine the right size and weight of the axe you choose.
    • Different Axes for Different Tasks: Match Your Axe to the Job
      Don’t take a hatchet to fell a tree or a felling axe to split logs. Having the right axe for the job will save you time, effort, and keep you safe.

    Safety First: Essential Guidelines for Safe Axe Use

    Protective Gear: What You Need and Why

    Safety first, folks. When we’re talking about how to use an axe, it’s important to gear up correctly. We all want to keep our fingers and toes intact, don’t we?

    That starts with a sturdy pair of gloves.

    Not only do they protect your hands from splinters and blisters, but they also provide a better grip on the axe handle. Just make sure they fit well and won’t slide off during a swing.

    Footwear is equally important. Safety boots with reinforced toe caps are your best bet. They’re designed to withstand impacts and can protect your feet if an axe were to accidentally drop. So, consider investing in a pair. It’s not just about comfort, it’s about safety too.

    Setting Up a Safe Work Area

    Now let’s discuss your workspace. It’s crucial to keep the area around you clear when swinging an axe. You don’t want to trip over a stray log or rock in the midst of a swing. Ensure that the area is free from obstacles that could interfere with your movement or the path of the axe.

    Equally important is to keep bystanders at a safe distance. You want to make sure your swinging radius is clear of people, especially if you’re in a populated area. It might be helpful to mark off your work area to alert others to keep their distance. After all, safety is a priority when an axe is in motion. It’s not just about respecting the tool, but also the space around you.

    Proper Grip and Stance: The Foundation of Effective Axe Use

    How To Swing An Axe!

    The Correct Way to Hold an Axe

    It’s all about the grip when it comes to handling an axe.

    If you hold the axe too tight, you’ll tire out your hands and might even lose control of your swing. If it’s too loose, the axe could slip right out of your hands. You’re aiming for a balance — a firm yet relaxed grip.

    Remember, your hands’ placement on the axe handle depends on the task at hand.

    For a powerful swing to chop a log, you might want to place one hand at the very end of the handle and the other closer to the axe head for control.

    If you’re doing more detailed work or need more precision, you might bring both hands closer to the head. Experiment and find what works best for you — just remember to keep that grip firm, yet relaxed. Be sure to watch the video above about how to use an axe the right way.

    Stance and Positioning: How to use an axe

    And just as important as your grip is your stance. Start by placing your feet shoulder-width apart to maintain balance. Your body should be square to the target, and remember to keep your knees slightly bent — it helps with balance and power transfer through your swing.

    The distance from the target is crucial too. A common way to determine this is to extend your arms with the axe towards the target — the blade should be just touching it. Remember, it’s not a static stance. You’ll need to adjust your positioning depending on the swing and the nature of the task.

    Getting the grip and stance right can feel a bit tricky initially, but with practice, you’ll find what works best for you. It sets the foundation for effective axe use, so take the time to get it right. It’s all part of the journey of mastering how to use an axe.

    Mastering the Swing: Techniques for Precision and Power

    • The Basic Downward Swing: Chopping 101
      This is the basic bread and butter of axe swings. Aim is key here. You want your axe hitting the same spot every time.
    • The Side Swing: Perfect for Splitting Logs
      Great for splitting logs, this requires a bit more finesse, and remember to let the weight of the axe do the work.

    Caring for Your Axe: A Guide to Maintenance and Storage

    • Cleaning and Sharpening: Keep Your Axe in Top Shape
      A dull axe is a dangerous axe. Regular sharpening and cleaning keep your axe effective and prolong its life.
    • Proper Storage: Protect Your Investment
      And don’t just toss your axe in a corner once you’re done. Store it in a dry place to protect the blade and handle from damage.

    Advanced Axe Techniques: Taking Your Skills to the Next Level

    • Fine-Tuning Your Swing: Advanced Tips for Precision and Efficiency
      Once you’ve mastered the basics, it’s time to up your game. Much like playing golf, techniques like the reverse swing and the planing cut can add to your repertoire.
    • Troubleshooting Common Issues
      Despite our best efforts, problems will arise. But don’t worry, most issues like glancing blows and stuck axes have simple solutions.

    Troubleshooting Common Issues

    Even with the best intentions and diligent application, it’s natural that we might encounter a hiccup or two when wielding an axe. Let’s tackle some of the common issues and how to overcome them.

    Glancing Blows: More than Just a Missed Shot

    If you’ve spent any time swinging an axe, you’ll have experienced a glancing blow – that jarring moment when your axe skews off the intended line, threatening to make an unwanted dent or worse, injure you. It’s usually a result of incorrect aim, a twisted swing, or even a dull blade. The good news is, with some tweaks to your technique and ensuring your axe is well maintained, you can reduce these mishaps.

    The Stuck Axe: When the Wood Fights Back

    Another common problem is the stuck axe. You give a good hard swing, expecting a satisfying split, but instead, your axe gets lodged firmly in the wood, refusing to budge.

    This is usually due to the type of wood you’re splitting or an off-centered hit.

    It’s vital to remain patient and avoid using forceful yanks that could risk damaging your axe or causing injury. Instead, use a steady, firm pull while ensuring a safe footing.

    Axe Isn’t Cutting Well: Could Be a Blunt Blade or Wrong Axe

    If your axe isn’t cutting as well as it should be, don’t just chalk it up to tough wood. A dull blade can significantly reduce your axe’s effectiveness.

    Regular sharpening should be part of your axe maintenance routine. Similarly, using the wrong type of axe for a specific task can also lead to poor results.

    Always ensure you’re using the right tool for the job.

    Remember, these issues are common, and with a bit of knowledge and practice, they’re entirely manageable. Always prioritize safety and ensure you’re taking care of your tools, and you’ll be back to efficient and satisfying chopping in no time.

    Becoming an Axe-Wielding Expert: A Journey, Not a Destination

    So there you have it. Remember, learning how to use an axe is a journey. It takes time, patience, and a lot of practice. But the satisfaction of a job well done, and the newfound respect for this ancient tool, makes it all worthwhile. So go on and embrace your inner lumberjack. It’s time to get chopping.

  • Which Stihl Chainsaw is Best For Me? An In-Depth Guide

    Which Stihl Chainsaw is Best For Me? An In-Depth Guide

    Finding the answer to the question, “Which Stihl chainsaw is the best for me?” is a journey that requires careful thought and evaluation. The Stihl brand stands tall in the market for its consistent delivery of high-quality, resilient, and multipurpose chainsaws.

    Given the vast range of options, the selection process might seem daunting, but this comprehensive guide will steer you toward the ideal Stihl chainsaw that aligns with your needs and preferences.

    Recognizing Your Chainsaw Usage Needs – Which Stihl Chainsaw is Best For Me?

    Identifying Your Chainsaw Requirements: Home Use Vs. Professional Applications

    The first step toward answering “Which Stihl chainsaw is best for me?” lies in identifying your specific requirements. The frequency and type of usage determine the kind of chainsaw that best suits your needs, whether you’re a homeowner engaging in occasional DIY projects or a professional lumberjack managing significant forestry tasks.

    Which Stihl Chainsaw is Best For Me? - So many Stihl options

    For example, if you’re a farmer handling vast land and regularly felling trees and chopping firewood, your needs may warrant more than one chainsaw with varying capacities. Conversely, if your use is limited to periodic pruning and trimming tasks in your backyard, a compact, lightweight model will suffice.

    Comparison Table of Different Stihl Chainsaw Models

    ModelEngine Power (KW)Recommended Guide Bar Length (inch/cm)Weight (kg)Ideal For
    MS-1701.2 KW12″-16″/30-40cm4.1 kgLight garden work, pruning, trimming
    MS-1801.4 KW12″-16″/30-40cm4.2 kgSmall to medium tree cutting, firewood preparation
    MS-2613.0 KW16″-20″/40-50cm4.9 kgMedium to large tree cutting, firewood cutting
    MS-6615.4 KW20″-28″/50-70cm7.4 kgLarge tree cutting, professional forestry work

    Key Specifications in Stihl Chainsaw Selection

    Significance of Power, Bar Length, and Weight

    To make an informed Stihl chainsaw choice, it’s crucial to understand key chainsaw specifications, such as:

    • power
    • bar length
    • weight

    Chainsaws with high power and longer guide bars are designed for larger, more intensive tasks, while smaller, lightweight models are well-suited for small to medium tasks and tend to be easier to handle and maneuver.

    Stihl’s Advanced Chainsaw Technologies Across Models

    Stihl’s reputation in the chainsaw market extends beyond powerful engines and exceptional cutting capacity. The company’s commitment to revolutionizing chainsaw technology is evident in the range of advanced features they’ve incorporated into various models. Here’s a closer look at the distinct technologies available and the models that feature them:

    ErgoStart (E):

    The ErgoStart system, often indicated with an ‘E’ in the model name, is designed to make starting Stihl chainsaws practically effortless. This technology reduces the strain on the user’s body and ensures smooth, jerk-free startups.

    Some Stihl chainsaw models equipped with the ErgoStart system include:

    • MS 180 C-BE – This model is a homeowner favorite, offering ErgoStart alongside its 1.4 KW power engine and 16″ guide bar, perfect for cutting firewood and handling light to medium tree cutting tasks.
    • MS 251 C-BE – This model is an excellent choice for heavier homeowner use or light professional use, boasting a 2.2 KW engine power, a guide bar length recommendation of 16″-18″, and the ErgoStart system for easy handling.
    • MS 362 C-M – A professional-class chainsaw with M-Tronic engine management and ErgoStart. This model has a 3.5 KW engine power and can handle a guide bar length of up to 25″.

    Quick Chain Tensioning (B):

    Quick Chain Tensioning, often indicated with a ‘B’ in the model name, is an innovative feature that enables quick and easy tensioning of the chainsaw’s chain. This feature eliminates the need for tools when adjusting the chain tension, thereby enhancing convenience and user safety.

    Chainsaws equipped with Quick Chain Tensioning include:

    • MS 171 C-BE – This model is suitable for lighter tasks around the house, like pruning and trimming. It’s equipped with a 1.3 KW engine and is recommended for a 14″-16″ guide bar length.
    • MS 211 C-BE – This mid-range model comes with a 2.3 KW engine and a recommended guide bar length of 16″-18″. It’s a practical choice for homeowners needing a bit more power for medium tree cutting or firewood preparation.
    • MS 250 C-BE – This powerful chainsaw comes with a 2.3 KW engine, ideal for tasks that require a bit more grunt, such as larger tree felling and firewood cutting. It can accommodate a guide bar length of up to 18″.

    It’s worth noting that many Stihl chainsaw models often feature both technologies, as indicated by ‘C-BE’ in the model name. This combination of advanced features enhances user experience by offering an easy-to-start and simple-to-maintain chainsaw.

    Making Your Stihl Chainsaw Choice

    Optimal Recommendations for Varied User Needs

    The best Stihl chainsaw for you hinges largely on your specific requirements and expectations. If you prioritize ease of use and mobility without the concerns of fuel storage, a battery-powered Stihl chainsaw would be an excellent choice. However, if you need to undertake demanding tasks that necessitate continuous power, a petrol-driven chainsaw would be more appropriate.

    Caring for Your Stihl Chainsaw

    Essential Chainsaw Maintenance Practices

    Investing in a Stihl chainsaw is only the first step in ensuring seamless, efficient work. The durability and long-term performance of your tool heavily depend on how you take care of it. Even the finest chainsaw needs regular upkeep to maintain its functionality.

    Regular Inspection and Cleaning

    The first and foremost step to keeping your Stihl chainsaw in tip-top condition is regular inspection and cleaning. Ensure that there’s no dust, dirt, or debris lodged in the chainsaw components, as this can result in reduced performance and premature wear. Make it a routine to clean your chainsaw after every use. Remember to disconnect the chainsaw from its power source before starting any cleaning process to avoid accidental startup.

    Chain Sharpening

    A chainsaw is only as good as its cutting edge, making chain sharpening a critical aspect of chainsaw maintenance. Dull chains not only make your work harder but also put unnecessary strain on the chainsaw engine, leading to faster wear and tear. It’s advisable to sharpen the chains regularly, based on the frequency of use and the type of material you’re cutting. Stihl offers a range of filing tools and guides to help you maintain the sharpness of your chainsaw blades.

    Guide Bar Oiling

    The guide bar on your chainsaw needs regular oiling to reduce friction between the chain and the bar, allowing smoother operation. Stihl chainsaws are equipped with automatic oiling systems, but it’s essential to check and refill the oil reservoir as needed. Use high-quality bar and chain oil for optimum performance and longevity.

    Air Filter Maintenance

    Your chainsaw’s air filter plays a critical role in keeping the engine clean by preventing dust, dirt, and other particles from entering it. A dirty or clogged air filter can lead to poor engine performance and increased fuel consumption. Stihl chainsaws feature easily accessible air filters, making cleaning or replacement a straightforward process. Regularly inspect and clean the air filter, especially if you’re working in dusty environments.

    Fuel and Oil Mixture

    If you’re using a gasoline-powered Stihl chainsaw, it’s crucial to use the correct fuel-to-oil ratio as recommended by Stihl. An incorrect mixture can lead to engine damage or inefficient operation. Always use fresh fuel and high-quality two-stroke engine oil.

    Regular Servicing

    In addition to these user-maintainable aspects, your Stihl chainsaw will benefit from regular professional servicing. Stihl dealers and service centres are equipped to perform detailed inspections, replace worn parts, and conduct fine-tuned adjustments to ensure your chainsaw continues to perform at its peak.

    Overall, maintaining your Stihl chainsaw involves a combination of daily checks, periodic user maintenance, and professional servicing. Proper care and attention not only extend your chainsaw’s lifespan but also ensure safer operation and superior performance.

    Final Thoughts

    In conclusion, the diversity of Stihl chainsaw models offers something for everyone, from casual backyard gardeners to professional foresters. Recognizing your chainsaw needs and understanding the different chainsaw specifications will empower you to select the ideal Stihl chainsaw model. Hopefully we have helped you today to work out which Stihl chainsaw is best for me?

  • Using a Log Splitter Vs Splitting by Hand: How to Split Wood Efficiently!

    Using a Log Splitter Vs Splitting by Hand: How to Split Wood Efficiently!

    As the golden hour paints the sky and you’re lookin’ at a heap of logs needing splitting, a thought might cross your mind – should you be using a log splitter vs splitting by hand?

    Well now, it’s not a one-size-fits-all answer, I’m afraid. Depends on a whole host of things.

    Let’s dive deeper into this, comparing the ins and outs of using a log splitter versus hand splitting.

    Why It Matters

    Splitting logs is essential for creating usable firewood, be it for your fireplace, campfire, or BBQ. The two primary ways of splitting logs are using a log splitter or doing it manually. Each method has its pros and cons – but there is no secret to splitting logs.

    Log Splitting Methods

    The Log Splitter

    using a log splitter vs splitting by hand? - This guy prefers his log splitter!

    A log splitter is a machine that uses electricity or gas to split logs. Log splitters can be manual, requiring physical force to operate, or hydraulic, which do the heavy lifting for you.

    Hand Splitting

    Hand splitting is the traditional method of splitting logs. It requires an axe or a maul and some muscle power. It can be physically demanding but also rewarding.

    Comparing Log Splitter and Hand Splitting

    Here’s a handy table that compares log splitters and hand splitting:

    Log SplitterHand Splitting
    EfficiencyHighLow
    Physical EffortLowHigh
    Initial CostHighLow
    Maintenance CostHighLow
    SafetyHigh (if used correctly)Medium (depends on technique)
    Environmental ImpactMedium to High (depends on power source)Low

    Safety and Environmental Impact

    Both methods require safety precautions. Log splitters require proper operation and hand splitting requires good technique and protective gear.

    In terms of environmental impact, hand splitting is greener because it only uses human energy. Log splitters, particularly gas-powered ones, have a higher carbon footprint.

    Choosing the Right Method for Your Situation

    Whether you choose a log splitter or hand splitting depends on your situation.

    • Home Use: If you have a small amount of wood, hand splitting could work. For larger piles, a log splitter is more efficient.
    • Professional Use: In commercial settings, a log splitter is usually better due to its speed and efficiency.
    • Occasional Use: For occasional use, like camping trips, hand splitting with an axe or maul is often enough.

    Tips for Both Methods – using a log splitter vs splitting by hand?

    Whether you’re using a log splitter or hand splitting, there are ways to improve your efficiency. Regular maintenance of your log splitter and honing your hand splitting technique can make the process smoother and more effective.

    What is the most effective way to split wood?

    The most effective way to split wood largely depends on your individual needs and resources. If efficiency and time-saving are paramount, using a hydraulic log splitter is often the most effective. It leverages mechanical force to split logs, requiring less physical exertion. However, for occasional use, smaller quantities, or to enjoy the traditional art of wood splitting, manual splitting using a maul or an axe can be equally effective.

    Is a manual log splitter worth it?

    The worth of a manual log splitter is contingent upon your specific requirements. Manual log splitters, compared to hydraulic ones, are less expensive, require no fuel, and are more portable. They are a good choice for those who don’t frequently need to split large volumes of wood, who value the physical exercise, or who want a quieter, more eco-friendly option. But, if you regularly deal with substantial amounts of hardwood, the speed and efficiency of an hydraulic or gas-powered splitter may justify its cost.

    Is it hard to split wood by hand?

    Splitting wood by hand can indeed be a challenging task, especially for beginners. It requires physical strength, endurance, and proper technique to be done efficiently and safely. However, like any skill, the difficulty decreases with practice and improved technique. Furthermore, using the right tools – like a well-balanced splitting axe or maul – can significantly reduce the hardship of the task.

    What is the best way to split logs by hand?

    The best way to split logs by hand is by following proper technique and safety precautions. Here’s a simple guide:
    Select the right tool: A splitting axe or a maul is typically used for this task. These tools are designed with a wider edge to help split the wood fiber.
    Position the log: Place the log you want to split on a sturdy, flat surface. An old tree stump is often used.
    Aim for the edges: Rather than aiming for the center, aim for the edges of the log. Hitting at the edge often causes the log to split more easily.
    Use the right technique: Stand with your feet shoulder-width apart. Hold the handle of the tool with both hands – one near the top of the handle and the other at the bottom. Lift the tool over your head and bring it down in a swift, controlled motion.
    Safety first: Always wear safety glasses and sturdy boots. Be aware of your surroundings to ensure that people and pets are at a safe distance. Remember, like any physical skill, proficiency comes with practice. Start with smaller logs and work your way up as you gain confidence and skill.

    Final Thoughts

    Choosing between using a log splitter vs splitting by hand is all about assessing your needs. Both methods have their place, and both can be effective when used properly. As long as you prioritize safety and efficiency, you can’t go wrong.

    Further Reading and Resources

    Want to learn more about log splitting? There are plenty of resources online, including forums, instructional videos, and training courses. The world of log splitting is wide open for exploration.

    Enjoy the journey!

  • How Tight Should a Chainsaw Chain Be: Ensuring Safety and Performance

    How Tight Should a Chainsaw Chain Be: Ensuring Safety and Performance

    Why Proper Chainsaw Chain Tension is Crucial

    Understanding the importance of how tight a chainsaw chain should be is paramount for both safety and optimal performance.

    This guide dives into the significance of maintaining correct chainsaw chain tension and factors influencing it. We also provide you with step-by-step instructions to check and adjust chain tension, discuss ideal tension guidelines, and share helpful chainsaw maintenance tips.

    So, how tight should a chainsaw chain be? Lets dig in and find out…

    The Consequences of Incorrect Chainsaw Chain Tension

    Chainsaw chain tension is essential to prevent accidents, improve cutting efficiency, and prolong your chainsaw’s lifespan. Operating a chainsaw with a chain that is either too loose or too tight can result in serious issues, such as kickbacks, diminished cutting effectiveness, and increased wear on the chain and bar.

    Factors Affecting Chainsaw Chain Tension

    Understanding Chain Types and Designs

    Different chainsaw chains, including full-chisel, semi-chisel, and low-profile chains, may have unique tension requirements due to their design and tooth configuration. Comprehending your specific chain type characteristics is vital for determining the appropriate tension.

    Adhering to Chainsaw Model and Manufacturer Recommendations

    Every chainsaw model comes with chain tension specifications provided by the manufacturer. Following these guidelines is critical for maintaining optimal performance and safety.

    how tight should a chainsaw chain should be - Man tightens the chain of his chainsaw
    Lumberjack sharpening and tightening chain on his chainsaw

    How to Check and Adjust Chainsaw Chain Tension

    Safety First: Positioning the Chainsaw Correctly

    Always ensure the chainsaw is switched off and placed on a stable surface. Engage the chain brake to prevent accidental chain movement.

    Using a Tensioning Tool or Screwdriver

    Utilize a specialized tensioning tool or a flathead screwdriver to access the tensioning mechanism. Refer to your chainsaw’s user manual for the precise location of the tensioning mechanism.

    Testing Chain Tension with Manual Force

    Apply gentle pressure to the center of the chain, pulling it away from the guide bar. The chain should lift approximately 1/8 to 1/4 inch, allowing for smooth movement without excessive sag or tightness.

    Ideal Chainsaw Chain Tension: General Guidelines

    Optimal Tension for Safety and Performance

    The perfect chainsaw chain tension strikes a balance between being taut enough to prevent sagging and loose enough to allow smooth movement around the guide bar.

    Following Manufacturer Guidelines and Specifications

    Adhere to the chainsaw manufacturer’s recommendations for specific tension requirements of your chainsaw model.

    Below are links to some popular chainsaw manufacturers where you can find model-specific guidelines:

    Remember to refer to the user manual for your specific chainsaw model for the manufacturer’s specific tension requirements and other maintenance guidelines. If you’ve misplaced the physical copy, you can typically find digital versions on the manufacturer’s website.

    Tools and Techniques for Adjusting Chainsaw Chain Tension

    Visual Tension Indicators and Tension Gauge Tools

    Some chainsaws feature visual tension indicators or tension gauge tools that assist in determining if the chain is properly tensioned.

    Manual Chain Tensioning Techniques

    Proper techniques involve loosening the bar nuts and adjusting the chain tension screw incrementally, checking the tension after each adjustment until the desired tension is achieved.

    The Importance of Proper Chain Lubrication

    Bar and chain oil is essential for lubricating the chain, reducing friction, and preventing premature wear. Regular maintenance ensures smoother cutting performance and prolongs the lifespan of the chain.

    Common Chainsaw Chain Tensioning Mistakes to Avoid

    Navigating the chainsaw chain tensioning process can be tricky, especially for beginners. Here are some common mistakes to avoid and what to keep in mind:

    Over-Tightening the Chainsaw Chain

    • Over-tightening is a common error that can lead to several adverse effects. It can put undue strain on the chainsaw’s engine, guide bar, and the chain itself.
    • A chain that’s too tight may cause premature wear, leading to a shortened lifespan of the chainsaw’s components.
    • Over-tight chains can increase fuel consumption and possibly result in damage to the chainsaw’s components.
    • Excessive tension prevents the chain from rotating freely around the guide bar, impacting the chainsaw’s cutting efficiency.

    Under-Tightening the Chainsaw Chain

    • Operating a chainsaw with a chain that’s too loose is another common mistake that can lead to safety hazards.
    • Loose chains are prone to causing kickbacks, a dangerous situation where the chainsaw can lurch back at the operator.
    • Chains that are too loose may derail from the guide bar, creating a potential hazard.
    • Loose chains also result in inefficient cutting performance and can accelerate wear on both the chain and guide bar.

    Ignoring Manufacturer’s Recommendations

    • The chainsaw manufacturer provides specific guidelines and specifications regarding chain tension for each model. These recommendations are based on comprehensive testing and are designed to ensure optimal performance and safety.
    • Ignoring these guidelines can compromise both the safety and the efficiency of the chainsaw. Always follow the manufacturer’s instructions to maintain optimal performance.
    • Ensure you understand how to apply the manufacturer’s guidelines properly. Misinterpretation could lead to either under- or over-tightening the chain.
    • Keep in mind that not all chainsaws are the same. Different brands and models may have different tensioning requirements.

    Neglecting Regular Checks and Adjustments

    • Chainsaw chains can loosen over time and with use. Regular checks and adjustments are necessary to maintain the correct tension.
    • Ignoring regular tension checks can result in the chain becoming either too tight or too loose without the operator noticing, leading to the problems mentioned above.
    • Even minor adjustments can have a significant impact on chainsaw performance and safety. Always check the chain tension before and after using the chainsaw.

    Remember, the goal is to maintain the chain’s contact with the guide bar while still allowing it to move freely. This balance ensures the chainsaw operates safely and effectively.

    Troubleshooting Chainsaw Chain Tension Issues

    Understanding how to identify and troubleshoot chainsaw chain tension issues can be invaluable for maintaining your chainsaw’s performance and prolonging its lifespan. Here are some key areas to focus on:

    Identifying Signs of Improper Chain Tension

    Look out for these signs of incorrect chain tension during chainsaw operation:

    • Excessive chain sag: If you notice the chain sagging or hanging off the guide bar, it’s likely too loose and needs tightening.
    • Erratic cutting performance: Difficulty cutting through wood, or the chainsaw creating rough, uneven cuts can indicate tension issues.
    • Accelerated chain wear: A chain that’s too tight or too loose can wear out faster than usual. Check for signs of excessive wear, like dull or damaged cutting teeth.
    • Unusual noise during operation: Strange noises like grinding or squealing can be a sign of improper tension.
    • Overheating of the chainsaw: Over-tight chains may cause the chainsaw to overheat due to increased friction.

    Resolving Issues with Loose Chainsaw Chains

    If you’ve identified that your chainsaw chain is too loose, here’s how to adjust it:

    • Turn off the chainsaw: Always ensure your chainsaw is turned off before making any adjustments to prevent accidental injury.
    • Loosen the bar nuts: Use an appropriate tool to loosen the bar nuts that secure the guide bar in place.
    • Adjust the tension screw: Locate the tensioning screw near the guide bar and turn it clockwise to tighten the chain.
    • Check and recheck: Make incremental adjustments, checking the tension after each adjustment until the proper tension is achieved. The chain should lift about 1/8 to 1/4 inch from the guide bar when pulled up gently.

    Dealing with Overly Tight Chainsaw Chains

    If your chainsaw chain is too tight, here’s how to relieve the tension:

    • Turn off the chainsaw: Just like with loosening the chain, ensure the chainsaw is turned off before adjusting.
    • Loosen the bar nuts: Using the appropriate tool, loosen the bar nuts that secure the guide bar.
    • Adjust the tension screw: Find the tensioning screw near the guide bar and turn it counter-clockwise to loosen the chain.
    • Regularly check the tension: Make small adjustments and keep checking the tension until it’s at the correct level.

    Remember, while making adjustments, the aim is to maintain the chain’s contact with the guide bar while still allowing it to move freely around the bar.

    Chainsaw Chain Maintenance Tips

    Proper maintenance of your chainsaw chain is essential for its performance, safety, and lifespan. Here are some critical aspects to focus on:

    Regular Cleaning of the Chainsaw Chain

    A dirty chainsaw chain can reduce efficiency and increase wear. To keep it clean:

    • Clean the chain after each use to remove accumulated sawdust, dirt, and other debris.
    • You can use a specialized brush or compressed air to clean the chain thoroughly.
    • Keeping the chain clean ensures smoother operation and reduces the risk of chain derailment due to debris getting caught in the chain.

    Sharpening the Chainsaw Chain Regularly

    A sharp chain cuts more efficiently and puts less strain on the chainsaw. Here are some tips:

    • Regularly check the sharpness of the chainsaw chain. If it’s dull or you find it requires more force to cut through the wood, it may be time for sharpening.
    • Dull chains can result in slower cutting, increased strain on the chainsaw, and decreased overall efficiency.
    • You can sharpen the chain yourself using a chainsaw file or take it to a professional for sharpening.
    • Remember, each time you sharpen the chain, it gradually reduces its life. So, replace it after it has been sharpened several times.

    Replacing Worn-Out Chains

    Chainsaw chains don’t last forever. Regularly check for signs of wear and replace the chain when needed:

    • Monitor the condition of the chain regularly. Replace it when it shows signs of excessive wear, such as damaged or missing cutting teeth or significant stretching.
    • A worn-out chain can reduce cutting performance and pose safety risks, including the potential for the chain to break during operation.
    • Always use high-quality replacement chains recommended by the chainsaw manufacturer. This ensures compatibility and optimal performance.

    These maintenance tasks, coupled with the proper tensioning of your chainsaw chain, will ensure that your chainsaw operates safely and effectively for a longer period.

    In Summary: How Tight Should a Chainsaw Chain Be

    Maintaining the correct chainsaw chain tension is crucial for safety, performance, and longevity of your chainsaw. Regularly checking the tension and addressing any issues promptly ensures a safe and efficient cutting experience.

    Please share this guide if you found it helpful, and comment below with any further questions on “how tight should a chainsaw chain be”. Check out our other guides for more tips and advice on chainsaw maintenance.

  • Choosing the Best Firewood for A Wood Burning Stove – 3 Great Options!

    Choosing the Best Firewood for A Wood Burning Stove – 3 Great Options!

    When it comes to heating your home with a wood burning stove, selecting the right firewood is crucial for efficiency, warmth, and safety.

    The type of firewood you use can significantly impact the heat output, burn time, and even the maintenance of your stove.

    In this comprehensive guide, we will explore the factors to consider when choosing firewood for a wood burning stove, highlight the best types of firewood, provide tips for preparation and efficient burning, and discuss safety precautions.

    So, let’s dive in and discover the secrets to selecting the best firewood for a wood burning stove.

    Understanding the Characteristics of Firewood

    To make an informed choice of the best firewood for a wood burning stove, it’s essential to understand the characteristics of firewood. Each type of wood has its own unique properties that affect its performance in a wood burning stove.

    • Heat Value: The heat value of firewood refers to the amount of heat it can produce when burned. Hardwoods, such as Oak, Maple, and Ash, have higher heat values and provide long-lasting warmth. On the other hand, softwoods like Pine, Cedar, and Fir have lower heat values but ignite quickly.
    • Burn Time: Burn time refers to how long firewood can sustain a fire. Hardwoods generally have longer burn times compared to softwoods. This means you’ll need to add less hardwood to the stove to maintain a consistent heat output.
    • Smoke Production: The amount of smoke produced by firewood can vary. Hardwoods typically produce less smoke than softwoods, making them ideal for those concerned about air quality and minimizing smoke buildup in the chimney.
    • Resin Content: Resin is a sticky substance found in some types of wood, and it can affect stove maintenance. Softwoods tend to have higher resin content, which can lead to the accumulation of creosote in the chimney. Regular cleaning is necessary when burning resinous wood.

    Best Firewood for a Wood Burning Stove

    Not all firewood is created equal. Some types of wood are more suitable for wood burning stoves due to their properties and performance.

    Hardwoods:

    • Oak: Oak is known for its high density, slow burn, and excellent heat output. It provides a steady and long-lasting fire, making it a popular choice for wood burning stoves.
    • Maple: Maple wood is prized for its clean-burning characteristics and its ability to produce a consistent heat output. It is also readily available in many regions.
    • Ash: Ash wood is highly regarded for its low moisture content and easy ignitability. It burns evenly and produces a steady heat, making it a reliable choice for wood burning stoves.
    Best firewood for a wood burning stove - Oak, Maple and Ash are great options!
    Iron pans over wood stove with highlighted flames. Typical wood oven in the countryside of Brazil. Sao Paulo state

    Softwoods:

    • Pine: Pine wood ignites quickly and produces a vibrant flame. It is often used as kindling due to its resin content. However, it’s important to use pine in moderation as its high resin content can lead to creosote buildup.
    • Cedar: Cedar wood is known for its pleasant aroma and easy lighting. It burns relatively quickly and provides a good heat output, but like pine, it should be used in moderation.
    • Fir: Fir wood is readily available and offers a decent heat output. It can be used as a supplementary firewood in combination with hardwoods to prolong burn time.

    Evaluating Firewood Moisture Content

    Moisture content plays a vital role in firewood performance. Burning wet or unseasoned wood can lead to inefficient combustion, increased smoke production, and the formation of excessive creosote.

    Importance of Seasoned Firewood: Seasoned firewood refers to wood that has been properly dried to reduce its moisture content. Burning seasoned firewood ensures cleaner and more efficient combustion, resulting in higher heat output and reduced smoke.

    Identifying and Measuring Moisture Content: Moisture meters are useful tools for determining the moisture content of firewood. Ideally, firewood should have a moisture content below 20% for optimal burning. Anecdote: One way to check if the firewood is properly seasoned is by knocking two pieces together. If they produce a hollow sound, it indicates that the wood is dry and ready to burn.

    Preparing Firewood for a Wood Burning Stove

    Properly preparing firewood enhances its performance and ensures a more enjoyable wood burning experience.

    Cutting and Splitting Techniques: When cutting firewood, it’s important to choose the right size for your wood burning stove. Logs should be cut into manageable lengths and split to expose the inner wood, which aids in drying and ignition. Anecdote: I once struggled to split a large log until I discovered the effectiveness of using a splitting maul—a heavy and powerful tool designed specifically for this purpose.

    Storing Firewood: Storing firewood properly is crucial for maintaining its low moisture content. It should be stacked off the ground, protected from rain and snow, and allowed to dry in a well-ventilated area. Anecdote: I learned the hard way that covering firewood too tightly with a tarp can trap moisture and hinder the drying process.

    Additional Considerations for Wood Burning Stoves

    Regional Availability: The availability of different firewood types may vary depending on your location. It’s important to choose firewood that is readily accessible and sustainable in your area.

    Environmental Impact and Sustainability: Selecting firewood from sustainable sources helps preserve forests and promotes ecological balance. Look for certified firewood suppliers or consider using fallen or reclaimed wood when possible.

    Avoiding Prohibited or Low-Quality Firewood: Some regions have regulations in place to prevent the spread of pests and diseases through firewood. It’s essential to be aware of any restrictions and avoid using prohibited or low-quality firewood.

    Tips for Efficiently Burning Firewood in a Stove

    Burning firewood efficiently maximizes heat output and reduces environmental impact. Follow these tips for optimal burning:

    Building a Proper Fire: Arrange the firewood in a way that allows proper airflow for efficient combustion. Start with kindling and gradually add larger pieces, ensuring enough space between logs for air circulation.

    Managing Airflow and Damper Settings: Adjust the stove’s air vents and damper to regulate the amount of oxygen supplied to the fire. Controlling airflow helps maintain an even burn and prevents excessive smoke.

    Safety Precautions when Using Firewood in a Stove

    While wood burning stoves can provide cozy warmth, safety should always be a top priority. Follow these safety precautions:

    Clearances and Ventilation Requirements: Ensure proper clearance between the stove and surrounding combustible materials. Adequate ventilation is essential to prevent the buildup of harmful gases and maintain indoor air quality.

    Regular Maintenance and Inspections: Schedule regular maintenance and inspections to keep your wood burning stove in safe working condition. Anecdote: I once discovered a small crack in the stove’s door gasket during a routine inspection, which, if left unattended, could have compromised the stove’s efficiency and safety.

    Final Thoughts

    Selecting the best firewood for a wood burning stove is a decision that can significantly impact your heating experience. By considering the heat value, burn time, smoke production, and resin content of different firewood types, you can choose the right wood that meets your specific needs.

    Based on the factors discussed in this article, my recommendation for the best firewood for a wood burning stove would be hardwoods such as

    • Oak
    • Maple
    • Ash.

    These hardwoods offer high heat values, long burn times, and less smoke production compared to softwoods. Additionally, ensure the firewood is properly seasoned with a moisture content below 20% for optimal burning efficiency.

    Remember to evaluate moisture content, prepare firewood properly, and prioritize safety precautions for a comfortable and safe wood burning experience. So, go ahead and enjoy the warmth and ambiance of your wood burning stove with the perfect firewood companion.

  • Heat N Glo Gas Fireplace Maintenance: What you Must Know!

    Heat N Glo Gas Fireplace Maintenance: What you Must Know!


    When the chill of winter encroaches upon your doorstep, the radiant warmth of a gas fireplace offers a comforting respite. However, preserving this indispensable comfort requires consistent and effective Heat n Glo gas fireplace maintenance.

    Ensuring this emblem of homely warmth remains functional and efficient not only supports your comfort but also safeguards your peace of mind.

    Understanding Your Heat & Glo Gas Fireplace

    Peeling back the curtain on your Heat & Glo gas fireplace, you’ll discover a meticulous assembly of integral components.

    From the burning ember bed and ceramic glass to the intelligent ignition systems, each part demands its share of care. By becoming conversant with these elements and their functions, you can approach Heat & Glo gas fireplace maintenance with well-informed confidence.

    heat n glo gas fireplace maintenance - it's important to understand your model

    Demystifying the Heat n Glo Gas Fireplace Maintenance Schedule

    Heat n Glo gas fireplace maintenance isn’t merely a winter task. Indeed, proper maintenance is a year-round commitment. Regular inspections and routine cleaning are necessary to ensure the optimum performance of your hearth. As summer blossoms into warmth, it’s an opportune time to check the venting system, ensuring it’s ready when winter makes its return.

    Step-by-step Guide to Basic Heat n Glo Gas Fireplace Maintenance

    Engaging in regular maintenance of your Heat & Glo gas fireplace is integral to its optimal performance and longevity. Here is a detailed, step-by-step guide to basic Heat & Glo gas fireplace maintenance tasks:

    • Cleaning Your Fireplace Start by turning off the gas valve to ensure safety during cleaning. Remove any loose debris from the fireplace and vacuum the area gently. A soft, dry cloth can be used to wipe down the exterior and the ceramic glass front. Avoid using harsh or abrasive cleaners, as these can damage the glass and other components of the fireplace. Instead, opt for products specifically designed for gas fireplaces, which can effectively clean without causing harm.
    • Inspecting the Venting System To maintain excellent indoor air quality, a thorough inspection of the venting system is necessary. With the gas valve securely closed, check the vent for blockages such as bird nests, leaves, or accumulated debris. It’s also crucial to inspect the vent cap on the outside of your home to ensure it is intact and functioning correctly. If you notice rust or damage to the venting system, professional help may be required for replacement or repair.
    • Checking the Pilot Light and Burner Reliable ignition is crucial for your Heat & Glo gas fireplace’s functionality. Carefully inspect the pilot light to ensure it burns a steady blue flame. If the flame is yellow or orange, this could indicate a problem with the gas mixture or venting. Similarly, the burner should light quickly and evenly. If it doesn’t, there might be clogged ports that need cleaning or other issues requiring professional attention. Always remember to turn off the gas valve before conducting any checks or maintenance on the pilot light and burner.
    • Glass Door Maintenance The glass door of your Heat & Glo gas fireplace is not just for viewing the mesmerizing flames; it’s also an important safety feature. Ensure the door is free from cracks or damages, and the latch closes securely. Regularly clean the glass door using an approved gas fireplace glass cleaner to maintain clarity and remove any soot or carbon buildup.
    • Checking Seals and Gaskets The seals and gaskets on the venting system play a critical role in preventing gas leaks. Regularly inspect these components for signs of wear or damage. If a seal or gasket looks compromised, it should be replaced immediately.
    • Overall Visual Inspection Finally, conduct an overall visual inspection of your fireplace. Look for any visible signs of wear or damage, paying particular attention to the gas log, burner, and control mechanisms. If anything seems amiss, it’s best to contact a professional.
    • Embracing these maintenance tasks helps maintain the beauty, safety, and functionality of your Heat & Glo gas fireplace, allowing you to bask in its warm glow for many more winters to come.

    Troubleshooting Common Heat n Glo Gas Fireplace Issues

    In the realm of Heat n Glo gas fireplace maintenance, detecting common issues early can prevent minor hiccups from escalating into severe problems. Here is a list of things to look out for:

    • Any unusual noises
    • Fluctuating flame patterns
    • an unresponsive ignition system – If you’re having trouble lighting your fireplace, it could be due to several reasons such as a faulty ignition switch, a clogged pilot orifice, or issues with the thermocouple or thermopile.
    • Unpleasant Odors – While it’s common to notice a faint smell when you first start your fireplace for the season, persistent unpleasant odors might indicate a problem. It could signal incomplete combustion due to issues with the air-to-gas ratio, or a potential gas leak, which requires immediate attention.
    • Soot Buildup – Excessive soot buildup can be a sign of incomplete combustion, often due to problems with the fireplace’s air-to-gas ratio. Soot can also stain the glass door of your fireplace, obscuring your view of the flames.
    • Uneven Heating – If your fireplace isn’t heating your room evenly or sufficiently, there could be an issue with the fan or blower. It might not be circulating air properly, or the fireplace’s output might not be high enough for the size of the room.
    • Damaged or Worn Out Logs Artificial gas logs can wear out over time, impacting the aesthetic appeal and potentially the performance of your fireplace. Inspect the logs regularly for signs of wear or damage.
    • Unexpected Shutdowns If your fireplace shuts down unexpectedly or refuses to stay lit, this could be due to a problem with the fireplace’s thermocouple or a venting issue. An overheated fireplace might also automatically shut off as a safety feature.

    Armed with a fundamental understanding of these issues, you can implement timely remedies and maintain the consistent operation of your fireplace.

    When to Call in the Professionals

    While a hands-on approach to Heat n Glo gas fireplace maintenance is commendable, there are times when the expertise of a professional becomes invaluable.

    Complex tasks such as inspecting gas lines or adjusting burner controls demand professional expertise. Regular professional inspections can pinpoint issues that may elude even the most vigilant homeowner, ensuring the enduring safety and performance of your fireplace.

    Choosing the Right Maintenance Tools and Products

    Possessing the right arsenal of maintenance tools enhances the efficacy of your Heat n Glo gas fireplace maintenance routine.

    While a soft cloth and vacuum cleaner can handle basic cleaning, specialized tools like a creosote brush can enhance your efforts. Pairing these tools with safe and effective cleaning products further bolsters the condition and appearance of your fireplace.

    Finding Qualified Heat & Glo Fireplace Maintenance Professionals

    The path to finding a trustworthy professional for Heat & Glo gas fireplace maintenance can be filled with uncertainty.

    Consider factors such as

    • certifications
    • experience
    • customer reviews,

    in your decision-making process. A qualified professional can ensure your fireplace receives comprehensive maintenance, preserving its charm and efficiency for countless winters to come.

    If you’re searching for ‘heat n glo service near me’ or even from further afield here is a short list of some technicans who I’m certain can pont you in the right direction:

    Heat n Glo Service Technicians:

    Heat and Glo Dealers:

    Heat n Glo Fireplace Manual and FAQs:

    Frequently Asked Questions About Heat & Glo Gas Fireplace Maintenance

    In the pursuit of comprehensive Heat & Glo gas fireplace maintenance, questions will inevitably arise. Whether you’re curious about the correct cleaning frequency or how to handle a stubborn pilot light, your queries deserve attention.

    Is there any maintenance required for gas fireplace?

    Yes, there is maintenance required for a gas fireplace, including Heat & Glo gas fireplaces. Regular maintenance tasks include cleaning the glass door, checking the vents for any blockages, inspecting the pilot light and burner, and examining the seals and gaskets for wear and tear. Regular professional inspections and servicing are also recommended for ensuring safety and optimal performance.

    How do you clean a heat & Glo gas fireplace?

    Cleaning a Heat & Glo gas fireplace involves several steps. Begin by turning off the gas valve for safety. Next, remove loose debris and gently vacuum the interior of the fireplace. Use a soft, dry cloth to wipe down the exterior and the ceramic glass front. Always use cleaning products specifically designed for gas fireplaces to avoid damaging the glass or other components. Finally, check for and remove any obstructions in the venting system.

    Why does my heat and Glo fireplace keep going out?

    A Heat & Glo fireplace might keep going out for several reasons. If the pilot light goes out, it could be due to a problem with the thermocouple, which senses the pilot flame and controls the gas flow. If the fireplace shuts down during operation, it might be overheating, which triggers an automatic safety shut-off. Issues with the venting system, such as blockages or damage, can also cause the fireplace to go out. If the problem persists, it’s recommended to seek professional help.

    Why won’t my pilot light stay lit on my heat and Glo?

    If the pilot light on your Heat & Glo fireplace won’t stay lit, there could be several potential causes. The pilot orifice might be clogged, preventing the flow of gas. There might be an issue with the thermocouple, which detects the flame and controls the gas supply. If the thermocouple is damaged or not correctly positioned, it may not sense the flame, causing the gas supply to be cut off and the pilot light to go out. In some cases, there might be a problem with the gas supply itself. It’s best to have a professional evaluate and fix these issues.

    Final Thoughts

    Proper Heat & Glo gas fireplace maintenance forms the cornerstone of a warm, inviting home. By taking an active role in maintaining your

    fireplace, you can enjoy its radiant warmth and enchanting ambiance for many winters to come. As the saying goes, “A little maintenance goes a long way,” and indeed, regular maintenance is the secret to a long-lasting, reliable Heat & Glo gas fireplace.

  • The Complete Guide to Ventless Gas Fireplace Maintenance

    The Complete Guide to Ventless Gas Fireplace Maintenance

    Imagine a chilly winter’s evening, the warmth from your ventless gas fireplace keeping the frosty weather at bay.

    But, what happens when the reliable heat source becomes unpredictable?

    Understanding and conducting regular ventless gas fireplace maintenance is the linchpin for enjoying countless cozy nights without incident.

    Title: The Complete Guide to Ventless Gas Fireplace Maintenance

    Vent Free Gas Burner Maintenance

    Getting Started:

    Ventless gas fireplaces, like any sophisticated piece of machinery, require an understanding of their intricate working mechanisms. This foundational knowledge is integral to mastering the art of fireplace maintenance. Equip yourself with necessary tools, including:

    • A non-abrasive brush
    • Microfiber cloths
    • A specialized gas fireplace glass cleaner
    • Compressed air canisters
    • An inspection mirror
    Ventless Gas Fireplace Maintenance is an important task to take on regularly

    Maintenance Fundamentals:

    Peering into the heart of your ventless gas fireplace, you’ll find a myriad of components each with a vital role:

    • The Vent-Free Gas Log Set: This component mimics the aesthetics of burning logs without the need for venting.
    • Control Valve and Knob: Regulates gas flow to control flame height.
    • Oxygen Depletion Sensor (ODS): An essential safety feature that shuts off the gas supply if oxygen levels dip below safe limits.
    • Pilot Light: The small flame that ignites the main burner.

    Regular cleaning and inspection of these parts ensure your fireplace performs optimally, keeping your home cozy.

    Deep Dive into Routine Maintenance:

    The essence of ventless gas fireplace maintenance lies in routine care. We recommend cleaning every three months—or every two months if you have pets.

    • Firstly, the burner needs careful attention. Ensure the primary air inlet holes, located at the end of the burner tube, are clean. You can use compressed air to blow through these ports. Remember to remove any large particles of dust or lint using a vacuum cleaner nozzle. An inspection mirror could be helpful here.
    • Next, the Oxygen Depletion Sensor (ODS). If your pilot flame has a yellow tip, this could indicate the ODS is dirty. There are two small pilot air inlet holes roughly two inches from where the pilot flame emerges. Ensure these are clean by lightly blowing air through them.
    • Checking the logs for dark streaks or soot buildup is also essential. This could indicate that one or more logs are out of position. Inspect for cracked or broken logs as well, replacing any that show signs of damage.
    • Burner Maintenance: Ensure the burner ports are clear of debris. A clogged port can lead to incomplete combustion and soot formation.
    • Thermocouple and Thermopile: Check these heat-sensitive devices that keep the gas valve open when the fireplace is on.

    Routine maintenance of your ventless gas fireplace might feel like conducting a symphony, with each element playing a crucial role:

    Advanced Maintenance Techniques:

    To ensure your fireplace operates at its best, adopt these advanced maintenance techniques:

    • Stain Removal: Use specialized gas fireplace glass cleaner to remove stubborn stains from the glass front.
    • Odor Management: Regular cleaning, correct log placement, and adequate combustion air help minimize unpleasant odors.
    • Preventive Measures: Conduct seasonal maintenance, keep kids and pets away from the fireplace, and never leave the fireplace unattended when on.

    Troubleshooting Common Issues:

    Knowledge of some common issues can save you time and unnecessary stress:

    • Pilot Light Problems: If the pilot light won’t stay lit, it could be a faulty thermocouple or thermopile.
    • Soot Formation: If there’s too much soot, the log placement may be incorrect, or the burner ports may be clogged.
    • Strange Smells: Persistent odors could be due to an unclean fireplace or improper combustion.

    Remember, if the problem seems beyond your capabilities, don’t hesitate to call a professional.

    Safety Considerations:

    Safety should be a priority when using a ventless gas fireplace:

    • Ensure good room ventilation to prevent carbon monoxide buildup.
    • Regularly check and test the ODS to ensure it’s functioning correctly.
    • Don’t keep flammable objects near the fireplace.

    Professional Services:

    Despite regular DIY maintenance, a professional inspection should be conducted annually. These experts perform a comprehensive check and maintenance process, enhancing your fireplace’s efficiency and safety. However, it’s crucial to choose a reputable service provider, considering their expertise, certifications, and customer reviews.

    Final Thoughts:

    Regular ventless gas fireplace maintenance is an investment in your home’s comfort, safety, and aesthetic appeal. By keeping a keen ear for any signs of trouble and using the right maintenance techniques, your fireplace will reward you with many years of reliable service.