Category: Axes

  • How to Sharpen an Axe – How to achieve a Razor Sharp Axe

    How to Sharpen an Axe – How to achieve a Razor Sharp Axe

    Hey there, this is Jim ‘The Lumberjack’.

    I’m here to teach you how to sharpen an axe, a key skill that’ll make your outdoor work a lot more efficient.

    No need to wrestle with a dull edge when a bit of elbow grease and know-how can have your axe cutting clean and true. It’s all about taking your time, using the right tools, and following the grain of good sense – just like splitting a seasoned log.

    So roll up your sleeves, folks, and let’s get to it—because there’s nothing quite like the feel of a well-sharpened axe in your hands.
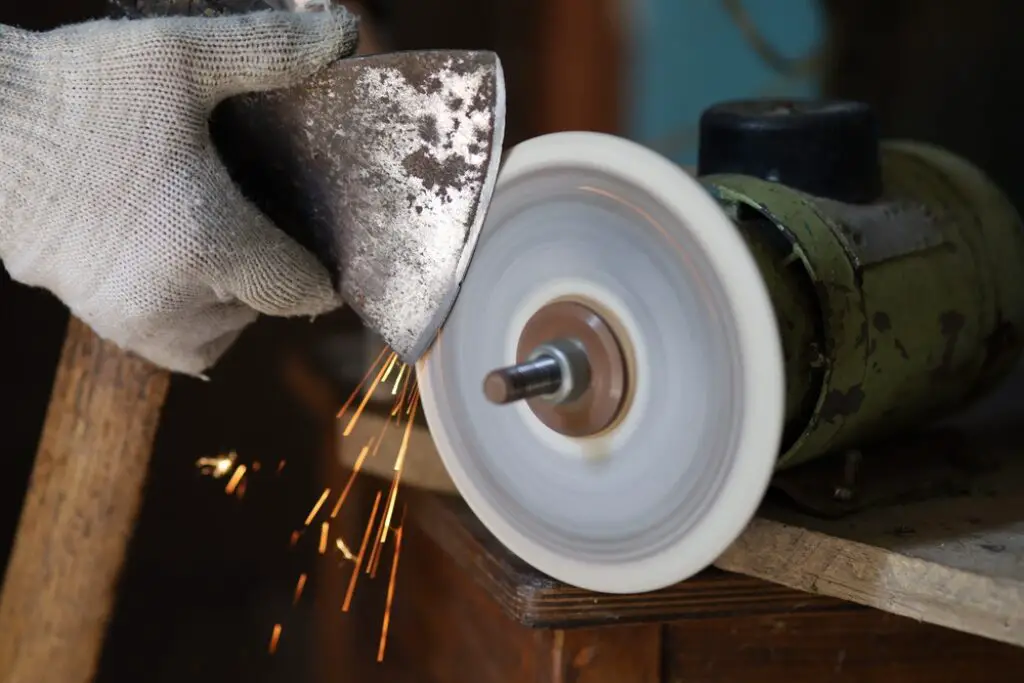
    How to sharpen an axe - A quick Guide to results

    Common Mistakes in Axe Sharpening: What to Avoid

    As with anything, how to sharpen an axe can have its pitfalls. Here are a few you’d do well to avoid:

    • Sharpening your axe when it’s not needed: An axe isn’t like a razor; it doesn’t need to be hair-splitting sharp. Over-sharpening can actually weaken the edge and increase the need for more frequent maintenance.
    • Ignoring the angle: The bevel angle is crucial when sharpening an axe. Too steep, and you’ll end up with a durable but dull edge. Too shallow, and you’ll get a sharp but fragile edge that chips easily.

    Rushing the Process: Why Patience is a Virtue in Axe Sharpening

    Don’t rush when you’re sharpening an axe. You’re not just honing metal; you’re crafting an edge. The process takes time, and each step needs to be done carefully and precisely. The end result is worth the extra attention to detail.

    How to Sharpen an Axe or Hatchet

    Wrong Tool, Wrong Time: Choosing the Correct Sharpening Tool

    Image Description: A diagram showing the main points on an axe.
Creator: RainbowRed
Source: Wikipedia
License: Free Art License

    One of the biggest mistakes in how to sharpen an axe is using the wrong tool at the wrong time. Here’s a basic guide:

    • Filing: This is for when your axe edge is significantly dull or has nicks. A file removes more material and can quickly reshape the edge.
    • Sharpening stone: Once your edge is shaped, the stone refines it, removing the scratches left by the file and honing a sharper edge.
    • Strop: This is the final touch. It aligns any leftover microscopic burrs, giving your axe that razor-sharp edge.

    Over-sharpening: A Surprising Mistake

    The goal of axe sharpening isn’t to get the sharpest edge possible; it’s to get the sharpest edge that will last. Over-sharpening can lead to an edge that’s razor sharp but brittle and more prone to chipping or rolling.

    Maintaining Your Axe’s Edge: Post-Sharpening Care

    Just as important as the sharpening process is taking care of the axe afterwards. Here are some tips to help your axe stay sharp longer:

    • Clean your axe after use: Simple, but crucial. Dirt and moisture are the enemies of your axe edge.
    • Oil the axe head: This prevents rust and keeps your axe in top condition.
    • Store your axe properly: Keep it somewhere dry, and cover the edge to protect it.

    Proper Cleaning: Protecting Your Axe after Sharpening

    After you’ve spent all that time sharpening, don’t let your hard work go to waste. Cleaning off any leftover metal filings and applying a light coating of oil protects your axe from rust and helps maintain the edge.

    Storing Your Axe: Where and How to Keep Your Axe

    Your axe isn’t a toy and shouldn’t be left lying around.

    An axe rack or magnetic tool bar is a good option for storing your axe. This keeps the axe edge from coming into contact with anything that might dull it.

    Expert Tips: Elevate Your Axe Sharpening Skills

    By now, you’re probably starting to feel like a bit of an expert yourself, but here’s a couple more tips on how to sharpen an axe to really up your game:

    • Always maintain control: Keep your sharpening tools and the axe steady when sharpening. Any slipping can result in an inconsistent edge or even an injury.
    • Don’t forget the handle: While the axe head gets all the attention, a good handle is just as important for effective axe use.
    how to sharpen an axe and maintain it so that it stays sharp

    Sharpening Angles: Finding the Sweet Spot

    Every axe and usage has its ideal sharpening angle, and finding this is more of an art than a science. A general guideline is 25-30 degrees for a chopping axe, and 20-25 degrees for a carving or splitting axe. Remember, the steeper the angle, the more durable but less sharp the edge will be.

    Reading the Burr: Advanced Axe Sharpening Tips

    After using your sharpening stone, run your fingers carefully along the edge of the axe. You should be able to feel a slight burr or lip of metal. This indicates that the edge is fully sharpened. Once you feel this burr along the entire edge, it’s time to stop sharpening and start honing.

    Regular Maintenance: Keeping Your Axe Sharp

    Regular maintenance is the key to keeping your axe sharp and ready for action. Don’t wait for your axe to become dull before you decide to sharpen it.

    A quick touch up after each use can make a big difference and prolong the periods between full sharpening sessions.

    The Journey to Axe Sharpening Mastery

    Sharpening an axe is as much about the journey as the destination. As you spend time with your axe, getting to know its quirks and temperaments, you’ll find yourself becoming more in tune with it. It becomes not just a tool, but an extension of yourself. So, remember, keep your axe sharp and it’ll never let you down. And whenever you hear the question, “how to sharpen an axe,” you’ll always have a story to tell.

  • How to Use an Axe. A No Nonsense Guide to NOT Bleeding Out.

    How to Use an Axe. A No Nonsense Guide to NOT Bleeding Out.

    I’ll tell you straight,

    If you’re the kind that loves the smell of fresh-cut wood and the satisfying ‘thwack’ of a well-placed swing, you’ve come to the right place.

    We’re talking about how to use an axe today, and it’s more than just swinging haphazardly and hoping for the best.

    Why Every Outdoorsman Should Know How to Use an Axe

    In my years in the great outdoors, I’ve learned one thing for sure – knowing how to use an axe isn’t just for chopping firewood. It’s a versatile tool that’s been serving us since time immemorial. Clearing a trail, setting up camp, even in emergencies – a trusty axe is an outdoorsman’s best friend.

    Understanding Your Axe: More Than Just a Chopping Tool

    Now, let’s get down to brass tacks.

    • Types of Axes: The Right Tool for the Right Job
      A felling axe for taking down trees, a splitting maul for making firewood, or a hatchet for carving and kindling – there’s an axe for every need.
    • Anatomy of an Axe: Getting Familiar with Your Equipment
      Understanding your tool is crucial. From the cutting edge to the butt, every part of the axe serves a purpose. This understanding will give you the edge you need when it comes to wielding your axe efficiently.

    Choosing the Right Axe for You: Factors to Consider

    How to use an axe - First you need to find the right one!
    • Size Matters: How to Choose the Right Length and Weight
      Like a good pair of boots, your axe needs to fit you well. Your strength, height, and the task at hand will determine the right size and weight of the axe you choose.
    • Different Axes for Different Tasks: Match Your Axe to the Job
      Don’t take a hatchet to fell a tree or a felling axe to split logs. Having the right axe for the job will save you time, effort, and keep you safe.

    Safety First: Essential Guidelines for Safe Axe Use

    Protective Gear: What You Need and Why

    Safety first, folks. When we’re talking about how to use an axe, it’s important to gear up correctly. We all want to keep our fingers and toes intact, don’t we?

    That starts with a sturdy pair of gloves.

    Not only do they protect your hands from splinters and blisters, but they also provide a better grip on the axe handle. Just make sure they fit well and won’t slide off during a swing.

    Footwear is equally important. Safety boots with reinforced toe caps are your best bet. They’re designed to withstand impacts and can protect your feet if an axe were to accidentally drop. So, consider investing in a pair. It’s not just about comfort, it’s about safety too.

    Setting Up a Safe Work Area

    Now let’s discuss your workspace. It’s crucial to keep the area around you clear when swinging an axe. You don’t want to trip over a stray log or rock in the midst of a swing. Ensure that the area is free from obstacles that could interfere with your movement or the path of the axe.

    Equally important is to keep bystanders at a safe distance. You want to make sure your swinging radius is clear of people, especially if you’re in a populated area. It might be helpful to mark off your work area to alert others to keep their distance. After all, safety is a priority when an axe is in motion. It’s not just about respecting the tool, but also the space around you.

    Proper Grip and Stance: The Foundation of Effective Axe Use

    How To Swing An Axe!

    The Correct Way to Hold an Axe

    It’s all about the grip when it comes to handling an axe.

    If you hold the axe too tight, you’ll tire out your hands and might even lose control of your swing. If it’s too loose, the axe could slip right out of your hands. You’re aiming for a balance — a firm yet relaxed grip.

    Remember, your hands’ placement on the axe handle depends on the task at hand.

    For a powerful swing to chop a log, you might want to place one hand at the very end of the handle and the other closer to the axe head for control.

    If you’re doing more detailed work or need more precision, you might bring both hands closer to the head. Experiment and find what works best for you — just remember to keep that grip firm, yet relaxed. Be sure to watch the video above about how to use an axe the right way.

    Stance and Positioning: How to use an axe

    And just as important as your grip is your stance. Start by placing your feet shoulder-width apart to maintain balance. Your body should be square to the target, and remember to keep your knees slightly bent — it helps with balance and power transfer through your swing.

    The distance from the target is crucial too. A common way to determine this is to extend your arms with the axe towards the target — the blade should be just touching it. Remember, it’s not a static stance. You’ll need to adjust your positioning depending on the swing and the nature of the task.

    Getting the grip and stance right can feel a bit tricky initially, but with practice, you’ll find what works best for you. It sets the foundation for effective axe use, so take the time to get it right. It’s all part of the journey of mastering how to use an axe.

    Mastering the Swing: Techniques for Precision and Power

    • The Basic Downward Swing: Chopping 101
      This is the basic bread and butter of axe swings. Aim is key here. You want your axe hitting the same spot every time.
    • The Side Swing: Perfect for Splitting Logs
      Great for splitting logs, this requires a bit more finesse, and remember to let the weight of the axe do the work.

    Caring for Your Axe: A Guide to Maintenance and Storage

    • Cleaning and Sharpening: Keep Your Axe in Top Shape
      A dull axe is a dangerous axe. Regular sharpening and cleaning keep your axe effective and prolong its life.
    • Proper Storage: Protect Your Investment
      And don’t just toss your axe in a corner once you’re done. Store it in a dry place to protect the blade and handle from damage.

    Advanced Axe Techniques: Taking Your Skills to the Next Level

    • Fine-Tuning Your Swing: Advanced Tips for Precision and Efficiency
      Once you’ve mastered the basics, it’s time to up your game. Much like playing golf, techniques like the reverse swing and the planing cut can add to your repertoire.
    • Troubleshooting Common Issues
      Despite our best efforts, problems will arise. But don’t worry, most issues like glancing blows and stuck axes have simple solutions.

    Troubleshooting Common Issues

    Even with the best intentions and diligent application, it’s natural that we might encounter a hiccup or two when wielding an axe. Let’s tackle some of the common issues and how to overcome them.

    Glancing Blows: More than Just a Missed Shot

    If you’ve spent any time swinging an axe, you’ll have experienced a glancing blow – that jarring moment when your axe skews off the intended line, threatening to make an unwanted dent or worse, injure you. It’s usually a result of incorrect aim, a twisted swing, or even a dull blade. The good news is, with some tweaks to your technique and ensuring your axe is well maintained, you can reduce these mishaps.

    The Stuck Axe: When the Wood Fights Back

    Another common problem is the stuck axe. You give a good hard swing, expecting a satisfying split, but instead, your axe gets lodged firmly in the wood, refusing to budge.

    This is usually due to the type of wood you’re splitting or an off-centered hit.

    It’s vital to remain patient and avoid using forceful yanks that could risk damaging your axe or causing injury. Instead, use a steady, firm pull while ensuring a safe footing.

    Axe Isn’t Cutting Well: Could Be a Blunt Blade or Wrong Axe

    If your axe isn’t cutting as well as it should be, don’t just chalk it up to tough wood. A dull blade can significantly reduce your axe’s effectiveness.

    Regular sharpening should be part of your axe maintenance routine. Similarly, using the wrong type of axe for a specific task can also lead to poor results.

    Always ensure you’re using the right tool for the job.

    Remember, these issues are common, and with a bit of knowledge and practice, they’re entirely manageable. Always prioritize safety and ensure you’re taking care of your tools, and you’ll be back to efficient and satisfying chopping in no time.

    Becoming an Axe-Wielding Expert: A Journey, Not a Destination

    So there you have it. Remember, learning how to use an axe is a journey. It takes time, patience, and a lot of practice. But the satisfaction of a job well done, and the newfound respect for this ancient tool, makes it all worthwhile. So go on and embrace your inner lumberjack. It’s time to get chopping.

  • Using a Log Splitter Vs Splitting by Hand: How to Split Wood Efficiently!

    Using a Log Splitter Vs Splitting by Hand: How to Split Wood Efficiently!

    As the golden hour paints the sky and you’re lookin’ at a heap of logs needing splitting, a thought might cross your mind – should you be using a log splitter vs splitting by hand?

    Well now, it’s not a one-size-fits-all answer, I’m afraid. Depends on a whole host of things.

    Let’s dive deeper into this, comparing the ins and outs of using a log splitter versus hand splitting.

    Why It Matters

    Splitting logs is essential for creating usable firewood, be it for your fireplace, campfire, or BBQ. The two primary ways of splitting logs are using a log splitter or doing it manually. Each method has its pros and cons – but there is no secret to splitting logs.

    Log Splitting Methods

    The Log Splitter

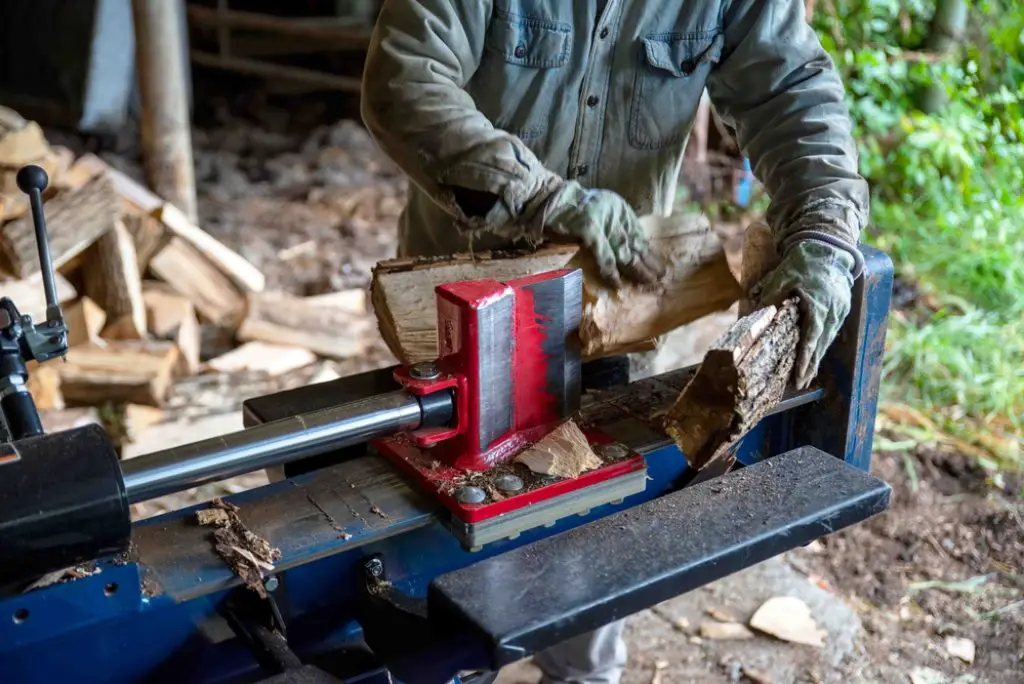
    using a log splitter vs splitting by hand? - This guy prefers his log splitter!

    A log splitter is a machine that uses electricity or gas to split logs. Log splitters can be manual, requiring physical force to operate, or hydraulic, which do the heavy lifting for you.

    Hand Splitting

    Hand splitting is the traditional method of splitting logs. It requires an axe or a maul and some muscle power. It can be physically demanding but also rewarding.

    Comparing Log Splitter and Hand Splitting

    Here’s a handy table that compares log splitters and hand splitting:

    Log SplitterHand Splitting
    EfficiencyHighLow
    Physical EffortLowHigh
    Initial CostHighLow
    Maintenance CostHighLow
    SafetyHigh (if used correctly)Medium (depends on technique)
    Environmental ImpactMedium to High (depends on power source)Low

    Safety and Environmental Impact

    Both methods require safety precautions. Log splitters require proper operation and hand splitting requires good technique and protective gear.

    In terms of environmental impact, hand splitting is greener because it only uses human energy. Log splitters, particularly gas-powered ones, have a higher carbon footprint.

    Choosing the Right Method for Your Situation

    Whether you choose a log splitter or hand splitting depends on your situation.

    • Home Use: If you have a small amount of wood, hand splitting could work. For larger piles, a log splitter is more efficient.
    • Professional Use: In commercial settings, a log splitter is usually better due to its speed and efficiency.
    • Occasional Use: For occasional use, like camping trips, hand splitting with an axe or maul is often enough.

    Tips for Both Methods – using a log splitter vs splitting by hand?

    Whether you’re using a log splitter or hand splitting, there are ways to improve your efficiency. Regular maintenance of your log splitter and honing your hand splitting technique can make the process smoother and more effective.

    What is the most effective way to split wood?

    The most effective way to split wood largely depends on your individual needs and resources. If efficiency and time-saving are paramount, using a hydraulic log splitter is often the most effective. It leverages mechanical force to split logs, requiring less physical exertion. However, for occasional use, smaller quantities, or to enjoy the traditional art of wood splitting, manual splitting using a maul or an axe can be equally effective.

    Is a manual log splitter worth it?

    The worth of a manual log splitter is contingent upon your specific requirements. Manual log splitters, compared to hydraulic ones, are less expensive, require no fuel, and are more portable. They are a good choice for those who don’t frequently need to split large volumes of wood, who value the physical exercise, or who want a quieter, more eco-friendly option. But, if you regularly deal with substantial amounts of hardwood, the speed and efficiency of an hydraulic or gas-powered splitter may justify its cost.

    Is it hard to split wood by hand?

    Splitting wood by hand can indeed be a challenging task, especially for beginners. It requires physical strength, endurance, and proper technique to be done efficiently and safely. However, like any skill, the difficulty decreases with practice and improved technique. Furthermore, using the right tools – like a well-balanced splitting axe or maul – can significantly reduce the hardship of the task.

    What is the best way to split logs by hand?

    The best way to split logs by hand is by following proper technique and safety precautions. Here’s a simple guide:
    Select the right tool: A splitting axe or a maul is typically used for this task. These tools are designed with a wider edge to help split the wood fiber.
    Position the log: Place the log you want to split on a sturdy, flat surface. An old tree stump is often used.
    Aim for the edges: Rather than aiming for the center, aim for the edges of the log. Hitting at the edge often causes the log to split more easily.
    Use the right technique: Stand with your feet shoulder-width apart. Hold the handle of the tool with both hands – one near the top of the handle and the other at the bottom. Lift the tool over your head and bring it down in a swift, controlled motion.
    Safety first: Always wear safety glasses and sturdy boots. Be aware of your surroundings to ensure that people and pets are at a safe distance. Remember, like any physical skill, proficiency comes with practice. Start with smaller logs and work your way up as you gain confidence and skill.

    Final Thoughts

    Choosing between using a log splitter vs splitting by hand is all about assessing your needs. Both methods have their place, and both can be effective when used properly. As long as you prioritize safety and efficiency, you can’t go wrong.

    Further Reading and Resources

    Want to learn more about log splitting? There are plenty of resources online, including forums, instructional videos, and training courses. The world of log splitting is wide open for exploration.

    Enjoy the journey!

  • What Size Axe for Splitting Wood – 10 of the Greats

    What Size Axe for Splitting Wood – 10 of the Greats

    You’ve got your axe in one hand, a piece of wood in the other, and you’re wondering what size axe for splitting wood would be best? The answer to this question is simpler than you think! This article will break down the benefits of different size axes and give you pointers on which ones are suitable for beginners. Whether you’re looking for a small hand axe or a large axe, the following options will provide all the information that you need to make an informed purchase.

    Below are some best-sized Rip Felling Axes & Splitting Axes

    Oregon Wood Axe

    50-inch strong handle, superb balance and long-lasting quality are what make the Oregon Wood Axe a favourite among woodchoppers.

    With a 28 inch long head and 3.2-pound weight, it’s made from high carbon steel that is hand forged by expert axe makers in the USA.

    With an unbreakable hickory handle, this axe is designed to withstand the striking of logs as well as hardwood cutting and carving tasks.

    Splitting Maul

    Splitting Maul - A great option.
    Male Lumberjack in the black-and-white plaid shirt with an ax chopping a tree in the forest.

    The hand-forged American made axe has a comfortable handle that locks in place for better control over your swings. It is also affordable when compared to other axes of the same size and make.

    The Splitting Maul comes with a lifetime guarantee from the manufacturer that spans the entire lifespan of your axe.

    The head is tapered for easier splitting and this, coupled with its high carbon steel, guarantees a long life for this product.

    Small Axe

    The Small Axe has two different sizes, the 36-inch version and the 48-inch version. This allows you to choose the appropriate size axe according to your needs.

    The head is solid and unbreakable which makes it a good choice for those who are looking for a durable product. However, it is not made of high carbon steel so it is of average strength and quite light in weight. It can be used for splitting logs but not hardwood.

    Fiskars IsoCore Maul

    The Fiskars Maul is a great axe with a quality head and handle. The head is made from high carbon steel that is hand-forged in the USA by expert axe makers.

    This axe has a tapered head for better splitting than the splitting of logs. The Fiskars IsoCore Maul can be used by both professionals and amateurs with little effort needed to do so as compared to other axes of the same size.

    The company offers a lifetime warranty on this product to all customers who buy it and they also provide replacement of equipment in the case of breakage.

    Husqvarna Hatchet

    The Husqvarna hatchet comes with a broad blade that is easy to handle and swing.

    It’s also balanced well and thus is best suited for both professionals as well as amateurs when compared to other axes of the same size.

    The head is tapered which means it’s easier to split logs. The handle is made from hickory with a hand-laid finish which provides a comfortable grip.

    This axe can be used to split logs as well as chop branches. It also comes with a lifetime guarantee from the manufacturer that covers repair or replacement of equipment under that warranty period in case of breakage of any product under it.

    Westward Hatchet

    The Westward Hatchet is a durable product that is made from high carbon steel that is hand-forged in the USA. It has a tapered head for better splitting and cutting.

    The handle is made of hickory with a hand-laid finish, which provides a comfortable grip. This axe can be used to split logs as well as chop branches and limbs.

    It also comes with a lifetime guarantee from the manufacturer that covers repair or replacement of equipment under that warranty period in case of breakage of any product under it.

    Axe Shock Axe

    This axe is one of the best options you can choose from when going for an axe. It has an unbreakable 10-inch head and 29 inches long handle. It weighs just 3 pounds, which makes it very lightweight making it great for those who are still new to the idea of splitting wood with axes.

    The head is made from high carbon steel that is hand-forged in the USA by expert axe makers. It also has a lifetime guarantee from the manufacturer which covers repair or replacement of equipment under that warranty period in case of breakage of any product under it.

    Ax Hatchet

    The Ax Shock Hatchet comes with a 10-inch head and a long 29-inch handle. This makes it pretty lightweight, especially when compared to other axes of the same size.

    It’s also balanced well and thus is best suited for both professionals as well as amateurs when compared to other axes of the same size.

    The head is made from high carbon steel that is hand-forged in the USA by expert axe makers. This steel is resistant to damage and thus helps you save more money in the long run.

    It also has a lifetime guarantee from the manufacturer which covers repair or replacement of equipment under that warranty period in case of breakage of any product under it.

    Tomahawk Axe

    The Tomahawk Axe is a highly durable product that is made from high carbon steel that is hand-forged in the USA. It has a tapered head for better splitting and cutting.

    The handle is made of hickory with a hand-laid finish which provides a comfortable grip. This axe can be used to split logs as well as chop branches and limbs.

    It also comes with a lifetime guarantee from the manufacturer which covers repair or replacement of equipment under that warranty period in case of breakage of any product under it.

    So, what size axe for splitting wood?

    Choosing the size of your hatchet or axe will depend on the type of wood you wish to cut and the amount.

    But in general, heavier axes are better for splitting wood because they are usually made from high carbon steel and they have long handles as well.

    The longer handle provides more power to each swing of the blade which means that you can more easily split even tough logs.

  • How to Make a Battle Axe Out of Wood – 7 Simple Steps

    How to Make a Battle Axe Out of Wood – 7 Simple Steps

    I was watching a movie last week that had a battle using axes, it was brutal!

    The lead character had to make his own battle axe using only the timber available to him.

    It got me wondering, would it be possible to figure out how to make a battle axe out of wood. I mean, the bigger question is How do you make a battle AXE?

    How to Make a Battle Axe Out of Wood

    You can make your own battle axe with wooden components with just some basic tools and materials, so it’s something that nearly anyone can do at home.

    In this article, we’ll give you the steps to follow and tips for making your own battle axe out of wood, so you can craft one of your own at home in no time!

    How to make Gimlis Battle-Axe out of wood! – Free templates

    How to Make a Wooden Axe in Real Life

    Learning how to make a battle axe out of wood – What You Need

    All you need for making a battle axe is wood and some tools. The first step is getting pieces of wood for your weapon. While hardwood such as oak or maple works best, softwoods like poplar are also viable options. You can even use plywood if you don’t have access to stronger materials.

    Regardless of what type of wood you choose, be sure it’s not treated in any way, as chemicals will damage your axe.

    Step 1- Gather Wood

    Although most battle axes are forged from iron, you can make one out of wood. Gather some scrap pieces of hardwood and shape them into an axe head. Cut a thick piece about four inches wide and about three feet long. Then carve it down on both sides so that it’s flat on both ends. This will be your axe head.

    Make sure you find another board about two inches in diameter—the handle—and use a hand saw to carefully cut it into six-inch-long segments. If you don’t have access to power tools, consider using a knife or hatchet instead; just know that it might take longer. Remember, too, if your handle is thicker than two inches it may not fit well on your blade.

    Step 2 – Cut the Wood

    Use your handsaw to cut two hardwood logs into 6-inch sections.

    These will be your axe’s blades. Next, use your handsaw and a framing square (or ruler) to fashion straight lines on each side of each blade that are 2 inches in from each end, dividing them into six equal parts.

    (A framing square has a 90-degree edge that can help you draw perfectly straight lines.)

    Set these aside for now.

    Step 3 – Shape the Blade

    If you want to know how to make a battle axe out of wood, you need to start with hardwood, such as oak or hickory. Round out one end of your wood log until it resembles an axe head.

    You’ll need hardwood for your handle too; ash is ideal because it’s both strong and lightweight. Split one end off and shape each piece into an axe handle until they fit together smoothly.

    Once you’ve cut all your pieces, join them together with iron nails or wooden pegs.

    Step 4 – Shape the Hilt

    The hardest part about making a battle axe is shaping and rounding off the grip for your hand. It’s imperative that you make it fit perfectly, as not only will you be holding onto it during use, but it can also become easily slippery when covered in (fake) blood.

    There are many ways to shape wood, including using an axe or a chainsaw; however, if you have neither of these at home (or work), then you’ll need something stronger than an old butter knife.

    Step 5 – Assemble It All Together

    After you have everything cut and sanded, assemble your battle axe. It’s as simple as drilling two holes on either side of each piece and slotting them together with wood glue.

    For added strength, make sure your wood pieces are not warped. You might need to put some heavy things on top while it dries overnight—but once it’s dried and assembled properly, you’ll be able to wield it in style.

    Step 6 – Finish It off with Leather and Fittings

    If you have several oak logs, and you’re determined to make one big battle axe, you can do so. You’ll need three heavy-duty leather belts (1 1/2 inches or wider), 8-10 inches long.

    Overlap two leather belts and lash them together with 2 foot segments of 3/8 inch dowel. This is your hilt; set it aside for now.

    Step 7 – A Final Coat of Paint?

    Once you’ve sanded your axe, wipe it down with some turpentine and give it a good coat of linseed oil. Linseed oil will make your wood shiny, but it also has benefits that go beyond aesthetics.

    It gives wood resistance to wear and tear while improving its tensile strength—otherwise known as its ability to bend without breaking.

    And that is How to make a battle axe out of wood!

    How to Make a Axe with Cardboard

    If this is all too much, you could think about making an axe out of cardboard. It will take a little time, but totally worth the effort. If you don’t need it to last through the weather or a LARP fight, a cardboard option could be a great one.

    Watch the video below to learn how to create your own:

    How to Make a DIY Viking Axe
  • How to Replace a Wooden Axe Handle – A Convenient Guide

    How to Replace a Wooden Axe Handle – A Convenient Guide

    In today’s world of throw-away tools and throw-away products, fixing a broken axe handle is a skill that not many people have anymore.

    It’s really not a difficult thing to do, but something that was commonplace in years gone by.

    This article will give you everything you need, to learn how to replace a wooden axe handle.

    These days, it’s pretty difficult to find an axe of any quality, or even a hatchet, or mallet.

    Most of what you’re going to find in your hardware store is going to be mostly rubbish, forged in Brazil, Mexico, or China with garbage steel.

    These types of cheap and nasty axe heads:

    • Don’t hold an edge very well
    • Aren’t tempered correctly
    • Essentially just a bunch of recycled material dumped into a cauldron melted down and poured in the form of an axe
    • Some cheap manufacturers go so far as to simply fill the blemishes and the pits with resin, and then just paint over it

    Honestly, at this point – if your axe shows signs of any of the above, I would think about getting yourself a new one or even better – a quality USED axe.

    What you need to Fix a Broken Axe Handle

    To learn how to replace a wooden axe handle you’re going to need a few tools.

    Here is a list of the things you will need:

    • Your broken axe
    • 80 grit sandpaper.
    • Standard premium wood glue.
    • 2 x Metal wedges
    • 1 x wood wedge
    • a few basic hand tools.
      • A Vice
      • Hammer

    In many instances, the handle of an axe can become recessed from the head and work loose (ie. the head of the axe appears to be coming off the top)

    How to fix a broken axe

    This is a very dangerous situation.

    The axe head could break off in mid-swing. More than one logger or woodworker has been seriously injured or killed in this situation.

    So let’s get to it,

    Steps for How to Replace a Wooden Axe Handle

    OK, I apologise the having 21 steps for how to fix a broken axe handle, but I wanted to give you more detail than you probably needed so you don’t miss anything. Good luck!

    1. Cut off the old handle underneath the base of the axe head
    2. With a large punch, drive the remaining handle out. Note that the hole in the bottom of the axe head, it’s larger than the hole on the top.
    3. So that you don’t forget which way up the axe head goes, take a centre punch on the top, and mark it
    4. Remove the metal wedges from the top of the old handle You’ll be needing these now that your axe head is removed
    5. Purchase yourself a new Axe Handle – See ‘What to look for in a new axe handle’ below
    6. Once you have the new handle, push the head down about an inch. You won’t get it fully on here though because the timber handle will widen. We need to custom fit it to the head.
    7. Place the new handle in your vice, it’s time to fit the head. Inserting it from the bottom slide it on and work it back and forth. Once you have pushed it on as far as you can, remove it.
    8. Take a good look at the timber handle. What you will see are the shiny points of contact on the timber where the axe head could not be pushed further. We are going to remove that material so that you can put the head on and slip it all the way up to where the handle is tapered.
    9. Use sandpaper of a pneumatic roll lock to slowly remove the excess wood to allow the head to slip on.
    10. Once you have enough of the excess wood removed, place the head on the handle and grip the head, whilst knocking the base of the handle on the floor – this will seat the head in tightly and leave some of the handle poking through the top of the head.
    11. An axe handle should come with an accompanying wooden wedge and a curf cut which splits the top of the handle in two, giving you a place to knock in the wedge. Place the wedge in the curf cut, making sure it’s not too wide apply some wood glue to the wedge on the bottom half and seat it in with as much hand pressure as possible.
    12. Use the old handle to place over the top of the wedge and knock it in further with a hammer.
    13. Use a Sawzall or hand saw to cut off the excess handle that is sticking out the top of the axe leaving about 3/16-1/8 of an inch above the axe head.
    14. Sandpaper down the top of the handle.
    15. Now we are installing the metal wedge. If you are working with a small axe, one metal wedge is enough, but two is appropriate on a larger axe
    16. Center the metal wedge right on the wood wedge and hammer it on in.
    17. Once the metal wedge is is flush, take a punch and knock it in just a little bit under the height of the wood.
    18. If you are working on a larger axe, evenly space the next metal wedge and repeat step 16 and 17 again.
    19. Use some 180 grit sandpaper and work the full length of the handle to remove any depressions, dirt or grease marks.
    20. Treat the wood of your new handle with the boiled linseed oil by using rubber gloves and wiping it over the handle. If you use a rag, you will find that most of the boiled linseed oil is wasted on the rag.
    21. Wait 15 mins and re-apply the boiled linseed oil 2 more times. Don’t forget the top of the handle.

    What to Look For in a New Axe Handle

    At some point, you will need to go and purchase a new handle for your axe. I would suggest that you visit a reputable hardware store to buy your new handle.

    • Make sure you purchase a new handle that is either made from Hickory or Ash.
    • DO NOT buy anything that has varnish on it. (Any manufacturer that would varnish on a handle clearly doesn’t know much about handles as you will certainly get blisters with any serious use.)
    • Make sure that the new handle is a bright white color.
    • If It has a lot of granulation, knots, or colors, avoid it.

    Where to find a decent axe to repair

    If your axe seems to be like one of the cheap and nasty ones described earlier, it’s possible that you may decide to just get yourself a new axe to work with.

    One thing I like to do is hit garage sales and find old axes.

    It’s possible to find some great quality second-hand axes around the place.

    One thing to look out for are axes that have USA markings on them. Anything you find with, USA, German, or Swedish markings, is typically going to be good quality steel.

    Now that you know how to easily replace the handle, don’t stress if the handle is in poor condition.

    Even if the head is all rusty, The key thing to look for here is whether or not it has a ‘clean edge’.

    In other words, are there chips, that are too large to be filed out?

    If it has a good solid edge, even if it’s not overly sharp, that’s okay – I can tell you how to fix that.

    As long as the head is in good shape, with a decent edge, no cracks, or anything obviously wrong with it -you have the makings of a fine tool that will not be replaced easily.